-
 1 启动数据库报错:ERROR! The server quit without updating PID file (/data/mysql/data/localhost.pid)解决方案没有找到日志文件,你试着在相应的目录下创建一个日志文件然后赋予相应的权限2 登录数据库报错Segmentation fault (core dumped)查看log,无报错 解决方案(1)修改terminal.c代码vim /home/mysql-8.0.20/extra/libedit/libedit-20190324-3.1/src/terminal.c(2)重新编译+初始化数据库cmake .. -DBUILD_CONFIG=mysql_release -DCMAKE_INSTALL_PREFIX=/usr/local/mysql -DMYSQL_DATADIR=/data/mysql/data -DWITH_BOOST=/home/mysql-8.0.20/boost/boost_1_70_0/make -j 96make -j 96 install(3)清除data数据,重新创建data目录rm -rf /data/mysql/data//usr/local/mysql/bin/mysqld --defaults-file=/etc/my.cnf --initializeservice mysql statusservice mysql start/usr/local/mysql/bin/mysql -uroot -p -S /data/mysql/run/mysql.sock3 报错:解决MySQL修改密码:ERROR 1290 (HY000): The MySQL server is running with the --skip-grant-tables option ERROR 1290 (HY000): The MySQL server is running with the --skip-grant-tables option so it cannot execute this statement(1)先执行:flush privileges;(2)再执行修改密码命令,可以了:登录数据库以后,修改通过root用户登录数据库的密码。alter user 'root'@'localhost' identified by "123456";创建全域root用户(允许root从其他服务器访问)。create user 'root'@'%' identified by '123456';进行授权。grant all privileges on *.* to 'root'@'%';flush privileges;4 安装mysql报错cmake .. -DBUILD_CONFIG=mysql_release -DCMAKE_INSTALL_PREFIX=/usr/local/mysql -DMYSQL_DATADIR=/data/mysql/data -DWITH_BOOST=/home/mysql-8.0.20/boost/boost_1_70_0/原环境gcc版本问题Cmake安装过程,make install报错bin/cmake: /lib64/libstdc++.so.6: version `GLIBCXX_3.4.26' not found (required by bin/cmake)检查动态库libstdc++.so.6版本尝试添加软连接,未解决问题最终解决方案:重新安装OS,编译成功5 mysql登录失败mysql -uroot -p -S /data/mysql/run/mysql.sock 报错:ERROR 2002 (HY000): Can't connect to local MySQL server through socket '/var/lib/mysql/mysql.sock' (2) 解决方案:只需要在/etc/my.cnf里添加[mysql]字段指定sock的位置到我们转移后的位置即可[mysql]socket=/data/mysql/mysql.sock重新启动mysql6 Mysql登录失败解决方案mkdir -p /tmp/mysqlchown mysql.mysql /tmp/mysql 7 data目录转移,mysql无法正常启动问题信息修改目录位置之后,数据库无法启动,并且没有生成error文件。问题根因 log文件和pid文件应该放在[mysqld]下面,移动位置后,mysql运行正常。8 Sysbench测试mysql连接不上测试参数sysbench --test= /home/sysbench-1.0.16/tests/include/oltp_legacy/parallel_prepare.lua --mysql-host=xxx --mysql-db=dbtest --mysql-port=3306 --mysql-user=root --mysql-password=123456 --oltp-tables-count=10 --oltp-table-size=100000 --threads=10 --time=120 --report-interval=10 preparenetstat –atunlp // mysql服务没有运行在3306端口解决方案导致无法远程连接mysql的原因是因为参数--skip-grant-tables,参考https://blog.csdn.net/weixin_43671497/article/details/84931578 去除mysql.cnf中的--skip-grant-tables 参数之后,出现3306端口mysql -uroot -h128.5.67.123 -p 成功登陆mysql建库之后,sysbench导数据成功9 my.cnf配置log-bin参数后mysql启动失败1.1.1 问题描述[问题描述]my.cnf配置log-bin参数后mysql启动失败:mysql@linux569:~/support-files> mysql.server startStarting MySQL..The server quit without updating PID file (/opt/mysql/data/linux569.pid). failed1.1.2 原因分析[问题分析]查看错误日志:2017-11-06T14:18:36.940533Z 0 [ERROR] Path '/opt/mysql/bin_log/' is a directory name, please specify a file name for --log-bin option日志打印比较明确:log-bin选项配置的时候,只能配置文件,不能设置为目录; 1.1.3 解决方法[解决方法]1、修改配置文件:/etc/my.cnf 中log_bin配置log_bin=/opt/mysql/bin_log/修改为:log_bin=/opt/mysql/bin_log/mysql-binlog 2、重启MySQL服务:(注意:mysql用户登录,如果有双机先冻结双机)关闭: mysql.server stop启动:./mysql.server start重启:./mysql.server restart查看状态:mysql.server status 10 Too many connections(连接数过多,导致连接不上数据库,业务无法正常进行)问题还原:mysql> show variables like'%max_connection%'; | Variable_name | Value | max_connections | 151 | mysql> setglobal max_connections=1;Query OK, 0 rows affected (0.00 sec) [root@node4 ~]# mysql -uzs -p123456 -h xxxERROR 1040 (00000): Too many connections 解决问题的思路:1、首先先要考虑在我们 MySQL 数据库参数文件里面,对应的 max_connections 这个参数值是不是设置的太小了,导致客户端连接数超过了数据库所承受的最大值。 该值默认大小是 151,我们可以根据实际情况进行调整。 对应解决办法:set global max_connections=500但这样调整会有隐患,因为我们无法确认数据库是否可以承担这么大的连接压力,就好比原来一个人只能吃一个馒头,但现在却非要让他吃 10 个,他肯定接受不了。反应到服务器上面,就有可能会出现宕机的可能。所以这又反映出了,我们在新上线一个业务系统的时候,要做好压力测试。保证后期对数据库进行优化调整。2、其次可以限制 Innodb 的并发处理数量,如果 innodb_thread_concurrency = 0(这种代表不受限制) 可以先改成 16 或是 64 看服务器压力。如果非常大,可以先改的小一点让服务器的压力下来之后,然后再慢慢增大,根据自己的业务而定,个人建议可以先调整为 16 即可。MySQL 随着连接数的增加性能是会下降的,在 MySQL 5.7 之前都需要让开发配合设置 thread pool,连接复用。MySQL 5.7 之后数据库自带 thread pool 了,连接数问题也得到了相应的解决。 11 MySQL安装过程中的报错[root@zs data]# /usr/local/mysql/bin/mysqld_safe --defaults-file=/etc/my.cnf &[1] 3758[root@zs data]# 170720 14:41:24 mysqld_safe Logging to'/data/mysql/error.log'. 170720 14:41:24 mysqld_safe Starting mysqld daemon withdatabases from /data/mysql170720 14:41:25 mysqld_safe mysqld frompid file /data/mysql/node4.pid ended 170720 14:41:24 mysqld_safe Starting mysqld daemon withdatabases from /data/mysql2017-07-20 14:41:25 0 [Warning] TIMESTAMPwith implicit DEFAULT value is deprecated. Please use --explicit_defaults_for_timestamp server option (see documentation formore details)./usr/local/mysql/bin/mysqld: File '/data/mysql/mysql-bin.index'not found (Errcode: 13 - Permission denied) 2017-07-20 14:41:25 4388 [ERROR] Aborting 解决思路:遇到这样的报错信息,我们要学会时时去关注错误日志 error log 里面的内容。看见了关键的报错点Permission denied,证明当前 MySQL 数据库的数据目录没有权限。解决方法:[root@zs data]# chown mysql:mysql -R mysql [root@zs data]# /usr/local/mysql/bin/mysqld_safe --defaults-file=/etc/my.cnf & [1] 4402 [root@zs data]# 170720 14:45:56 mysqld_safe Logging to '/data/mysql/error.log'. 170720 14:45:56 mysqld_safe Starting mysqld daemon with databases from /data/mysql 启动成功。如何避免这类问题,个人建议在安装 MySQL 初始化的时候,一定加上--user=mysql,这样就可以避免权限问题。./mysql_install_db --basedir=/usr/local/mysql/ --datadir=/data/mysql/ --defaults-file=/etc/my.cnf --user=mysql 12 数据库密码忘记的问题[root@zs ~]# mysql -uroot -p Enter password: ERROR 1045 (28000): Access denied foruser 'root'@'localhost' (using password: YES) [root@zs ~]# mysql -uroot -p Enter password: ERROR 1045 (28000): Access denied foruser 'root'@'localhost' (using password: YES) 我们有可能刚刚接手别人的 MySQL 数据库,而且没有完善的交接文档。root 密码可以丢失或者忘记了。解决思路:目前是进入不了数据库的情况,所以我们要考虑是不是可以跳过权限。因为在数据库中,MySQL数据库中 user 表记录着我们用户的信息。解决方法:启动 MySQL 数据库的过程中,可以这样执行:/usr/local/mysql/bin/mysqld_safe --defaults-file=/etc/my.cnf --skip-grant-tables & 这样启动,就可以不用输入密码,直接进入 MySQL 数据库了。然后在修改你自己想要改的 root 密码即可。update mysql.user set password=password('root123') where user='root'; 13 数据库总会出现中文乱码的情况有同学经常会问,为什么我的数据库总会出现中文乱码的情况。一堆中文乱码不知道怎么回事?当向数据库中写入创建表,并插入中文时,会出现这种问题。此报错会涉及数据库字符集的问题。解决思路:对于中文乱码的情况,记住老师告诉你的三个统一就可以。还要知道在目前的 MySQL 数据库中字符集编码都是默认的 UTF8。处理办法: 数据终端,也就是我们连接数据库的工具设置为 utf8。 操作系统层面,可以通过 cat /etc/sysconfig/i18n 查看,也要设置为 utf8。 数据库层面,在参数文件中的 mysqld 下,加入 character-set-server=utf8。Emoji 表情符号录入 MySQL 数据库中报错:Caused by: java.sql.SQLException: Incorrect string value: '\xF0\x9F\x98\x97\xF0\x9F...' for column 'CONTENT' at row 1 at com.mysql.jdbc.SQLError.createSQLException(SQLError.java:1074) at com.mysql.jdbc.MysqlIO.checkErrorPacket(MysqlIO.java:4096) at com.mysql.jdbc.MysqlIO.checkErrorPacket(MysqlIO.java:4028) at com.mysql.jdbc.MysqlIO.sendCommand(MysqlIO.java:2490) at com.mysql.jdbc.MysqlIO.sqlQueryDirect(MysqlIO.java:2651) at com.mysql.jdbc.ConnectionImpl.execSQL(ConnectionImpl.java:2734) at com.mysql.jdbc.PreparedStatement.executeInternal(PreparedStatement.java:2155) at com.mysql.jdbc.PreparedStatement.execute(PreparedStatement.java:1379) 解决思路:针对表情插入的问题,一定还是字符集的问题。处理方法:我们可以直接在参数文件中,加入:vim /etc/my.cnf [mysqld] init-connect='SET NAMES utf8mb4' character-set-server=utf8mb4 注:utf8mb4 是 utf8 的超集。 14 使用 binlog_format=statement 这种格式,跨库操作,导致从库丢失数据,用户访问导致出现错误数据信息当前数据库二进制日志的格式为:binlog_format=statement在主库设置 binlog-do-db=mydb1(只同步mydb1这一个库)。在主库执行 use mydb2;insert into mydb1.t1 values ('bb');这条语句不会同步到从库。但是这样操作就可以;use mydb1;insert into mydb1.t1 values ('bb');因为这是在同一个库中完成的操作。在生产环境中建议使用binlog的格式为row,而且慎用 binlog-do-db 参数。15 can't open file (errno:24)有的时候,数据库跑得好好的,突然报不能打开数据库文件的错误了。解决思路:首先我们要先查看数据库的 error log。然后判断是表损坏,还是权限问题。还有可能磁盘空间不足导致的不能正常访问表;操作系统的限制也要关注下;用 perror 工具查看具体错误!linux:/usr/local/mysql/bin # ./perror 24 OS error code 24: Too many open files 超出最大打开文件数限制!ulimit -n 查看系统的最大打开文件数是 65535,不可能超出!那必然是数据库的最大打开文件数超出限制!在 MySQL 里查看最大打开文件数限制命令:show variables like 'open_files_limit';发现该数值过小,改为 2048,重启 MySQL,应用正常。处理方法:repair table ;chown mysql 权限清理磁盘中的垃圾数据
 -
## 1 TiDB Binlog TiDB binlog为PingCap自定义格式的日志,非MySQL官方标准binlog。(参考官网文档https://docs.pingcap.com/zh/tidb/v3.0/binlog-consumer-client ) 目前Drainer提供了很多输出方式,通过对drainer进行配置实现日志直接回放到目标库(MySQL、TiDB)以及日志落盘(File)的功能,此外为了满足部分用户自定义需求,增加输出到kafka的功能,将TiDB日志以ProtoBuf定义数据结构输出到消息队列中,让用户业务端自行消费。官方提供了标准的binlog.proto文件,用户可以在自己的代码工程中通过proto官方工具生成解析代码,便于使用。执行以下操作自动生成代码: protoc.exe --java_out=.binlog.proto ## 2 TiDB Binlog组件 TiDB binlog组件提供类似MySQL主从复制功能,其主要由PD(pump client)、pump 集群、drainer功能模块构成。参考官方文档:https://pingcap.com/blog-cn/tidb-ecosystem-tools-1/  TiDB Server:每个事务的写入伴随着prewrite binlog以及commit binlog/rollback binlog,从而实现2pc算法。其中主要将commit_ts作为后续事务整合排序的关键,由PD模块统一申请生成。 Pump Client:维护Pump集群信息,通过心跳机制对pump节点探活,binlog写请求分发中心,通过range、hash(start_ts)、score等路由策略将请求分到每个active pump中。其中还要遵循Commit binlog必须发送到它对应prewrite binlog的Pump原则。 Pump:处理来自pump client的请求,并且负责binlog的存储。Binlog数据顺序写入数据文件,同时通过内置leveldb保存binlog的元信息(ts、类型、长度、保存文件及文件中位置)。 Drainer:TiDB通过Drainer组件来实现binlog对外输出,目前支持:kafka(消息队列)、文件(增量备份文件方式)、下游目标数据库(MySQL系列)。该组件收集所有pump的binlog数据,根据其commit_ts进行归并排序,然后下发给下游。TiDB binlog和MySQL binlog一样,DML操作日志本身不包含表结构信息,Drainer通过在内存中构建表结构快照,ddl的时候就回放,dml的时候就根据当前快照生成SQL。Drainer在下游回放SQL的时候,采用多协程的方式提高效率,并引入数据冲突检测机制,保证数据一致性。 ## 3 tidb本地单机版(开启binlog)环境搭建 单机部署环境环境:Linux(随便购买一台ecs)+ mysql客户端 官方参考手册 https://docs.pingcap.com/zh/tidb/dev/get-started-with-tidb-binlog 1、下载 ``` wget http://download.pingcap.org/tidb-latest-linux-amd64.tar.gz ``` 2、解压 tar -xzf tidb-latest-linux-amd64.tar.gz ``` cd tidb-latest-linux-amd64/ ``` 3、./bin/pd-server --config=pd.toml &>pd.out & ``` //【pd.toml】 log-file="/data/tidb/logs/pd.log" data-dir="/data/tidb/pd.data" ``` 4、./bin/tikv-server --config=tikv.toml &>tikv.out & ``` //【tikv.toml】 log-file="/data/tidb/logs/tikv.log" [storage] data-dir="/data/tidb/tikv.data" [pd] endpoints=["127.0.0.1:2379"] [rocksdb] max-open-files=1024 [raftdb] max-open-files=1024 ``` 5、./bin/pump --config=pump.toml &>pump.out & ``` //【pump.toml】 log-file="/data/tidb/logs/pump.log" data-dir="/data/tidb/pump.data" addr="127.0.0.1:8250" advertise-addr="127.0.0.1:8250" pd-urls="http://127.0.0.1:2379" ``` 6、sleep 3 && ./bin/tidb-server --config=tidb.toml &>tidb.out & ``` //【tidb.toml】 store="tikv" path="127.0.0.1:2379" [log.file] filename="/data/tidb/logs/tidb.log" [binlog] enable=true ``` 7、./bin/drainer --config=drainer.toml &>drainer.out &(配置kafka的下游端) ``` //【drainer.toml】 log-file="/data/tidb/logs/drainer.log" [syncer] db-type="kafka" [syncer.to] zookeeper-addrs = "10.154.218.217:2181" kafka-addrs = "10.154.218.217:9092" kafka-version = "1.1.0" kafka-max-messages = 1024 topic-name = "zlz" ``` ## 4 TiDB解析demo 1、Main方法:  2、Kafka解析成Binlog对象:  3、proto解析结果:  4、commit_ts是由PD根据物理时间和逻辑时间生成而来,根据其获取正确的timestamp,后续可以根据这个值去做实时增量同步时延。根据源码go语言用java实现。参考源码:https://github.com/tikv/pd/blob/04ff28f436debac2c5655238b3189af0407145c8/pkg/tsoutil/tso.go#L28  ## 5 参考链接 https://pingcap.com/blog-cn/tidb-ecosystem-tools-1/#TiDB-Binlog-%e6%ba%90%e7%a0%81%e9%98%85%e8%af%bb
-
一. 环境信息二. 安装MySQL81.执行yum install sql2.输入y进行安装3.查看版本,未找到命令 4.查看安装目录,有mysql,但无法启动服务 ll /usr/local/mysql/ 三. 问题解决思路 1.查看数据库版本/usr/local/mysql/bin/mysql --version 2.查看mysql启动时读取配置文件的默认目录。/usr/local/mysql/bin/mysql --help | grep my.cnf which my.cnf 由此可见,现阶段想要在openEuler上部署并使用MySQL8,需要我们手动编辑配置文件、加载servie服务、配置环境变量四. 创建数据库目录 1.运行以下命令创建数据存储目录/var/lib/mysql和进程所需的相关目录。为了方便后续安装,提前在/var/lib/mysql/log/目录下创建mysql.log文件。mkdir /var/lib/mysql cd /var/lib/mysql/ mkdir data tmp run log touch /var/lib/mysql/log/mysql.log 2.运行以下命令修改存储目录的用户组和用户权限为mysql:mysql。chown -R mysql:mysql /var/lib/mysql/ ll /var/lib/mysql/ ll /var/lib 五. 修改配置文件 1.运行以下命令修改配置文件 rm -f /etc/my.cnf echo -e "[mysqld_safe]\nlog-error=/var/lib/mysql/log/mysql.log\npid-file=/var/lib/mysql/run/mysqld.pid\n\n[mysqldump]\nquick\n\n[mysql]\nno-auto-rehash\n\n[client]\nport=3306\nmax_allowed_packet=64M\ndefault-character-set=utf8\n\n[mysqld]\nuser=root\nport=3306\nbasedir=/usr/local/mysql\nsocket=/var/lib/mysql/run/mysql.sock\ntmpdir=/var/lib/mysql/tmp\ndatadir=/var/lib/mysql/data\ndefault_authentication_plugin=mysql_native_password\nskip-grant-tables\nkey_buffer_size=16M" > /etc/my.cnf 2.运行以下命令查看配置文件cnfcat /etc/my.cnf 3.运行以下命令修改配置文件/etc/my.cnf的用户组和用户权限。chown mysql:mysql /etc/my.cnf ll /etc/my.cnf 六. 加载service服务 1.运行以下命令加载service服务。chmod 777 /usr/local/mysql/support-files/mysql.server cp /usr/local/mysql/support-files/mysql.server /etc/init.d/mysql chkconfig mysql on 2.运行以下命令修改/etc/init.d/mysql的用户组和用户权限。chown -R mysql:mysql /etc/init.d/mysql ll /etc/init.d/mysql 七. 配置环境变量 1.将MySQL二进制文件路径配置到环境变量中 。echo export PATH=$PATH:/usr/local/mysql/bin >> /etc/profile 2.在root条件下使环境变量配置生效。source /etc/profile 3.检查环境变量env 八. 初始化并启动数据库 1.初始化并启动数据mysqld --defaults-file=/etc/my.cnf –initialize 注意:最后一行末尾处生成的为初始密码,注意保存。 2.查看数据目录下数据文件/data/mysql/data的用户组和用户权限,并将文件用户组和用户权限更改为mysql:mysql。chown -R mysql:mysql /var/lib/mysql/data ll /var/lib/mysql/data 3.以root用户启动数据库。service mysql start 4.查看数据库状态。service mysql status 5.数据库进程与端口。ps -ef | grep mysql netstat -anpt netstat -anpt | grep mysql九. 访问MySQL数据库 1.登录数据库 提示输入密码时,请输入上一步初始化中产生的初始密码。mysql -u root -p -S /var/lib/mysql/run/mysql.sock 2.修改通过root用户登录数据库的密码 。flush privileges; alter user 'root'@'localhost' identified by "123456"; 3.远程登录MySQL的账号。 示例账号为user、密码为123456。create user 'user'@'%' identified by '123456'; 4.赋予用户user全部权限,并允许远程主机使用user账号访问MySQL,并使配置生效。grant all privileges on *.* to 'user'@'%' with grant option; flush privileges; 5.查看用户。select user,host from mysql.user; 6.退出数据库。 执行\q或者exit退出数据库。 7.下一次以root用户登录,需输入新设置的密码。 8.关闭数据库。service mysql stop 至此,MySQL8的部署完成。
-
【问题现象】上传参数表后在校验时,DWS-MySQL-Client-Node 参数信息校验失败:failed to login mysql db【问题分析】登录对应的虚拟机数据库节点查看mysql进程不存在,多次尝试启动失败 ps -ef|grep mysql 查看主节点是否正常,如果正常则重建备节点 查看另一个节点是否为主节点,ip a,浮动ip在该节点则说明其是主节点 并查看其进程正常 决定对备节点进行重建【解决方案】重建备节点,重建成功后,重试工步 登录备节点,切换到mysql用户,使用pathon脚本进行重建 python /usr/local/bin/MHA_RebuildSlave.py 10.28.74.187 //ip为对应主节点对应的ip等待building完成,查看数据库状态,HA状态Get_db_status.pyGet_HA_status.py查看进程是否正常备节点重建成功,再次重试校验通过。
-
-
 Mysql:select str_to_date('20201127193000','%Y%m%d%H%i%s');DWS:Oracle兼容模式:select to_date('2020-11-27 19:30:00','YYYY-MM-DD HH24:MI:SS');TD兼容模式(akc使用TD兼容模式):select to_timestamp('2020-11-27 19:30:00','YYYY-MM-DD HH24:MI:SS');
 -
Mysql:select date_format(now(), '%Y-%m-%d %H:%i:%s');select date_format(now(), '%Y/%m/%d %H:%i:%s');DWS:select to_char(now(),'YYYY-MM-DD HH24:MI:SS');select to_char(now(),'YYYY/MM/DD HH24:MI:SS');
-
创建测试表并插入数据create table test(id int);insert into test values('1');insert into test values('2');insert into test values('3');insert into test values('4');insert into test values('5');insert into test values('6');Mysql:select * from test limit 1,3;DWS:select * from test limit 3 offset 1;
-
double类型对应float类型;Mysql:Create Table di_corp_replay_prd_indic_d ( live_id varchar(50) , tag_price double ) ;DWS:Create Table di_corp_replay_prd_indic_d ( live_id varchar(50) , tag_price float ) ;
-
AUTO_INCREMENT自增列修改为serial类型,bigint对应bigserial,int对应serial;Mysql:CREATE TABLE `lrs_audit_rule_package`( `id` BIGINT(20) AUTO_INCREMENT PRIMARY KEY COMMENT '主键', `package_code` varchar(6) NOT NULL COMMENT '规则包', `package_type` varchar(2) NOT NULL COMMENT '规则包类型', `package_desc` varchar(100) COMMENT '描述', `create_time` datetime DEFAULT NULL COMMENT '创始时间', `modified_time` datetime DEFAULT NULL COMMENT '修改时间') ENGINE=InnoDB COMMENT='审核规则包';DWS:CREATE TABLE lrs_audit_rule_package( id bigserial PRIMARY KEY , package_code varchar(6) NOT NULL, package_type varchar(2) NOT NULL, package_desc varchar(100), create_time TIMESTAMP WITHOUT TIME ZONE DEFAULT NULL , modified_time TIMESTAMP WITHOUT TIME ZONE DEFAULT NULL)distribute by hash(id);
-
数据类型datetime需要替换为TIMESTAMP WITHOUT TIME ZONEMysql:Create Table outer_edw_akapp_order_info (p_p_order_date datetime);DWS:Create Table outer_edw_akapp_order_info (p_p_order_date TIMESTAMP WITHOUT TIME ZONE);
-
表注释需要单独写在表结构之外Mysql:Create Table `adb3_di_corp_anomaly_orderid_detail_15m` ( `corpid` varchar(50)) COMMENT='商家订单异常明细';DWS:Create Table adb3_di_corp_anomaly_orderid_detail_15m ( corpid varchar(50)) DISTRIBUTE BY HASH(corpid);comment on table adb3_di_corp_anomaly_orderid_detail_15m is '商家订单异常明细';
-
列注释需要单独写在表结构之外Mysql:create table sdfd(`id` bigint COMMENT '主键');DWS:create table sdfd(id bigint);COMMENT ON column SDFD.ID IS '主键';
-
#### jdbc的参数配置 当我们用jdbc连MySQL的时候,有一个连接串,一般形如 ``` jdbc:mysql://127.0.0.1:3307/test_tb?connectTimeout=5000&serverTimezone=UTC&zeroDateTimeBehavior=convertToNull&characterEncoding=UTF8&useConfigs=fullDebug ``` 还有时候我们会用一个properties对象配置参数,这些参数是怎么发挥作用的,而且有什么约束呢,带着这个问题,我们慢慢研究一下jdbc的源码 ##### 参数传递 1、jdbc中连接数据库的入口在DriverManager的getConnection中,会把user,password放入properties中 ``` //DriverManager.java @CallerSensitive public static Connection getConnection(String url, java.util.Properties info) throws SQLException { return (getConnection(url, info, Reflection.getCallerClass())); } @CallerSensitive public static Connection getConnection(String url, String user, String password) throws SQLException { java.util.Properties info = new java.util.Properties(); if (user != null) { info.put("user", user); } if (password != null) { info.put("password", password); } return (getConnection(url, info, Reflection.getCallerClass())); } @CallerSensitive public static Connection getConnection(String url) throws SQLException { java.util.Properties info = new java.util.Properties(); return (getConnection(url, info, Reflection.getCallerClass())); } ``` 2、MySQL jdbc建立连接的处理在NonRegisteringDriver的connect中,会把连接串拼接成url§{properties}格式,生成ConnectionUrl对象包装起来 ``` //com.mysql.cj.conf.ConnectionUrl#buildConnectionStringCacheKey private static String buildConnectionStringCacheKey(String connString, Properties info) { StringBuilder sbKey = new StringBuilder(connString); sbKey.append("\u00A7"); // Section sign. sbKey.append( info == null ? null : info.stringPropertyNames().stream().map(k -> k + "=" + info.getProperty(k)).collect(Collectors.joining(", ", "{", "}"))); return sbKey.toString(); } ``` 3、然后整个url§{properties}会给ConnectionUrlParser处理,通过CONNECTION_STRING_PTRN正则匹配出scheme(jdbc:mysql), authority(ip:port), path(dbname),query(url中的参数部分),并通过PROPERTIES_PTRN匹配出url中的参数对 ``` Pattern CONNECTION_STRING_PTRN = Pattern.compile("(?[\\w\\+:%]+)\\s*" // scheme: required; alphanumeric, plus, colon or percent + "(?://(?[^/?#]*))?\\s*" // authority: optional; starts with "//" followed by any char except "/", "?" and "#" + "(?:/(?!\\s*/)(?[^?#]*))?" // path: optional; starts with "/" but not followed by "/", and then followed by by any char except "?" and "#" + "(?:\\?(?!\\s*\\?)(?[^#]*))?" // query: optional; starts with "?" but not followed by "?", and then followed by by any char except "#" + "(?:\\s*#(?.*))?"); Pattern PROPERTIES_PTRN = Pattern.compile("[&\\s]*(?[\\w\\.\\-\\s%]*)(?:=(?[^&]*))?"); ``` 4、最后通过ConnectionUrl的collectProperties,把参数放入ConnectionUrl自己的properties里面去。由此可见,通过url配置参数与properties配置参数效果基本是一样的 ``` //com.mysql.cj.conf.ConnectionUrl#collectProperties protected void collectProperties(ConnectionUrlParser connStrParser, Properties info) { // Fill in the properties from the connection string. connStrParser.getProperties().entrySet().stream().forEach(e -> this.properties.put(PropertyKey.normalizeCase(e.getKey()), e.getValue())); // Properties passed in override the ones from the connection string. if (info != null) { info.stringPropertyNames().stream().forEach(k -> this.properties.put(PropertyKey.normalizeCase(k), info.getProperty(k))); } // Collect properties from additional sources. setupPropertiesTransformer(); expandPropertiesFromConfigFiles(this.properties); injectPerTypeProperties(this.properties); } ``` 5、当然参数值,还有其它的设置方式,比如expandPropertiesFromConfigFiles方法里面就是在是预置配置在com/mysql/cj/configurations/xxx.properties里面,例如url中增加&useConfigs=fullDebug,就可以在参数中增加如下四个参数; 还有一些其它的配置,比如dbname,既可以配置在port/后面,也可以以参数的形式配置 ``` profileSQL=true gatherPerfMetrics=true useUsageAdvisor=true logSlowQueries=true explainSlowQueries=true ``` 最终所有这些参数会封装成一个HostInfo对象 ##### 参数名与取值约束 1、建立连接的时候,会创建一个com.mysql.cj.jdbc.ConnectionImpl对象,它有两个属性:HostInfo(hostInfo为我们声明的参数),和PropertySet系统参数 2、所有PropertySet配置的属性名称,都必须是com.mysql.cj.conf.PropertyKey类中定义的名字 3、所有PropertySet配置的属性值的设置规则,都必须是com.mysql.cj.conf.PropertyDefinitions#PROPERTY_KEY_TO_PROPERTY_DEFINITION中定义的规则 值的规则有,boolean, enum, string,int,long等几种PropertyDefinition 4、属性值的用com.mysql.cj.conf.RuntimeProperty保存 其中UML关系如下: 连接与参数属性 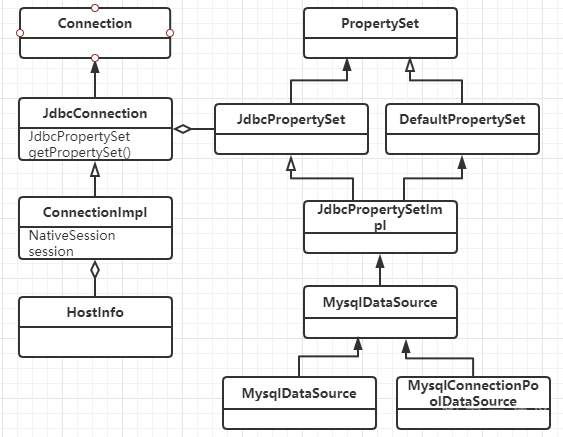 参数属性名与属性值 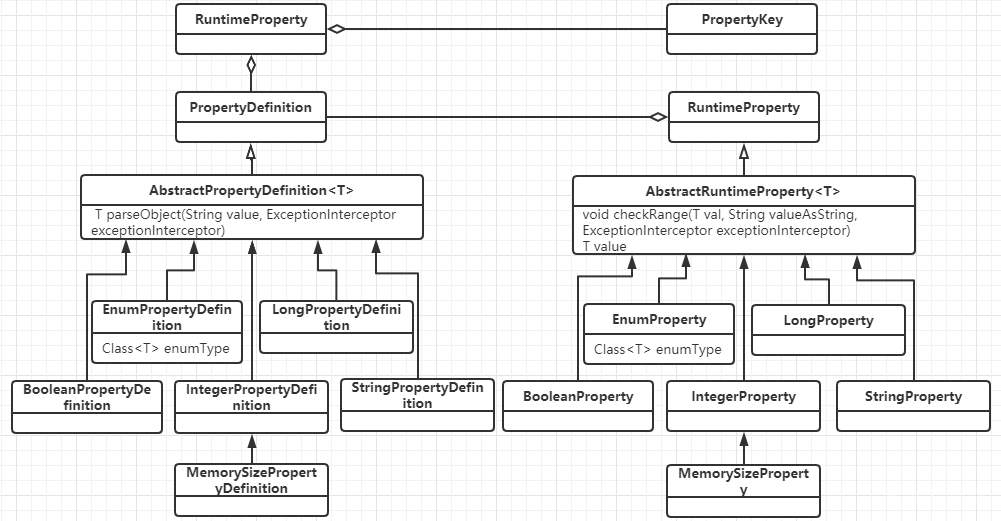 连接相关的对象 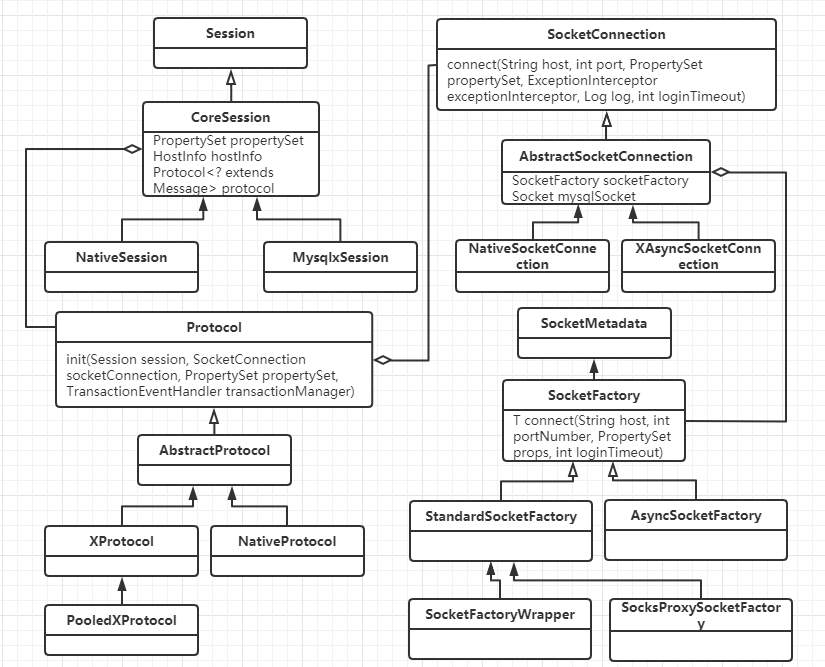 ##### 参数使用 1、TCP连接 创建连接默认是通过com.mysql.cj.protocol.StandardSocketFactory做TCP连接,当然也可以通过socketFactory参数来配置 其中给socket配置的时候,使用到了tcpNoDelay,tcpKeepAlive,tcpRcvBuf,tcpSndBuf,tcpTrafficClass几个参数 连接地址使用到了ip, port参数 连接参数使用了connectTimeout和socketTimeout 可以通过useReadAheadInput,useUnbufferedInput两个bool参数决定使用哪种输入流 如果单次连接失败,还会根据initialTimeout(int),maxReconnects(int)来重试 2、协议连接 协议连接配置是在com.mysql.cj.protocol.a.NativeProtocol里面做的, 其中使用到useNanosForElapsedTime,maintainTimeStats(bool),maxQuerySizeToLog(int),autoSlowLog(bool),,maxAllowedPacket(int),profileSQL(bool),autoGenerateTestcaseScript(bool),useServerPrepStmts(bool), 慢查询相关logSlowQueries(bool),slowQueryThresholdMillis(int),useNanosForElapsedTime(bool),slowQueryThresholdNanos(int) 3、读取服务端参数 首先读取一个服务端发来的数据包,把服务端的参数设置到com.mysql.cj.protocol.a.NativeCapabilities对象里去,包括protocolVersion,serverVersion,threadId,seed,flag,capabilityFalgs,serverDefaultCollationIndex,authPluginDataLength 其中capabilityFalgs为服务端参数集,具体值及其意思,可以从com.mysql.cj.protocol.a.NativeServerSession中的那些值判断看出来 ``` public static final int CLIENT_LONG_PASSWORD = 0x00000001; /* new more secure passwords */ public static final int CLIENT_FOUND_ROWS = 0x00000002; public static final int CLIENT_LONG_FLAG = 0x00000004; /* Get all column flags */ public static final int CLIENT_CONNECT_WITH_DB = 0x00000008; public static final int CLIENT_COMPRESS = 0x00000020; /* Can use compression protcol */ public static final int CLIENT_LOCAL_FILES = 0x00000080; /* Can use LOAD DATA LOCAL */ public static final int CLIENT_PROTOCOL_41 = 0x00000200; // for > 4.1.1 public static final int CLIENT_INTERACTIVE = 0x00000400; public static final int CLIENT_SSL = 0x00000800; public static final int CLIENT_TRANSACTIONS = 0x00002000; // Client knows about transactions public static final int CLIENT_RESERVED = 0x00004000; // for 4.1.0 only public static final int CLIENT_SECURE_CONNECTION = 0x00008000; public static final int CLIENT_MULTI_STATEMENTS = 0x00010000; // Enable/disable multiquery support public static final int CLIENT_MULTI_RESULTS = 0x00020000; // Enable/disable multi-results public static final int CLIENT_PS_MULTI_RESULTS = 0x00040000; // Enable/disable multi-results for server prepared statements public static final int CLIENT_PLUGIN_AUTH = 0x00080000; public static final int CLIENT_CONNECT_ATTRS = 0x00100000; public static final int CLIENT_PLUGIN_AUTH_LENENC_CLIENT_DATA = 0x00200000; public static final int CLIENT_CAN_HANDLE_EXPIRED_PASSWORD = 0x00400000; public static final int CLIENT_SESSION_TRACK = 0x00800000; public static final int CLIENT_DEPRECATE_EOF = 0x01000000; ``` 4、配置客户端参数 根据capabilityFalgs及propertySet的值来设置clientParams的值,包括useCompression,createDatabaseIfNotExist,useAffectedRows,allowLoadLocalInfile,interactiveClient,allowMultiQueries,disconnectOnExpiredPasswords,connectionAttributes, 根据capabilityFalgs及propertySet的来useInformationSchema,sslMode做一些校验 还会使用defaultAuthenticationPlugin,disabledAuthenticationPlugins,authenticationPlugins,serverRSAPublicKeyFile,allowPublicKeyRetrieval来做认证插件相关配置 认证阶段,还会使用到user, password, database的信息 认证完之后,还会根据useCompression,traceProtocol,enablePacketDebug,packetDebugBufferSize来配置本地的环境 5、设置session参数可以通过参数sessionVariables来配置 ``` // public void setSessionVariables() { String sessionVariables = getPropertySet().getStringProperty(PropertyKey.sessionVariables).getValue(); if (sessionVariables != null) { List variablesToSet = new ArrayList(); for (String part : StringUtils.split(sessionVariables, ",", "\"'(", "\"')", "\"'", true)) { variablesToSet.addAll(StringUtils.split(part, ";", "\"'(", "\"')", "\"'", true)); } if (!variablesToSet.isEmpty()) { StringBuilder query = new StringBuilder("SET "); String separator = ""; for (String variableToSet : variablesToSet) { if (variableToSet.length() > 0) { query.append(separator); if (!variableToSet.startsWith("@")) { query.append("SESSION "); } query.append(variableToSet); separator = ","; } } sendCommand(this.commandBuilder.buildComQuery(null, query.toString()), false, 0); } } } ``` 6、查询服务端参数 建立连接之后,会在com.mysql.cj.NativeSession里面请求服务端参数,并把参数存储到ServerSession中 ``` //com.mysql.cj.NativeSession#loadServerVariables if (versionMeetsMinimum(5, 1, 0)) { StringBuilder queryBuf = new StringBuilder(versionComment).append("SELECT"); queryBuf.append(" @@session.auto_increment_increment AS auto_increment_increment"); queryBuf.append(", @@character_set_client AS character_set_client"); queryBuf.append(", @@character_set_connection AS character_set_connection"); queryBuf.append(", @@character_set_results AS character_set_results"); queryBuf.append(", @@character_set_server AS character_set_server"); queryBuf.append(", @@collation_server AS collation_server"); queryBuf.append(", @@collation_connection AS collation_connection"); queryBuf.append(", @@init_connect AS init_connect"); queryBuf.append(", @@interactive_timeout AS interactive_timeout"); if (!versionMeetsMinimum(5, 5, 0)) { queryBuf.append(", @@language AS language"); } queryBuf.append(", @@license AS license"); queryBuf.append(", @@lower_case_table_names AS lower_case_table_names"); queryBuf.append(", @@max_allowed_packet AS max_allowed_packet"); queryBuf.append(", @@net_write_timeout AS net_write_timeout"); queryBuf.append(", @@performance_schema AS performance_schema"); if (!versionMeetsMinimum(8, 0, 3)) { queryBuf.append(", @@query_cache_size AS query_cache_size"); queryBuf.append(", @@query_cache_type AS query_cache_type"); } queryBuf.append(", @@sql_mode AS sql_mode"); queryBuf.append(", @@system_time_zone AS system_time_zone"); queryBuf.append(", @@time_zone AS time_zone"); if (versionMeetsMinimum(8, 0, 3) || (versionMeetsMinimum(5, 7, 20) && !versionMeetsMinimum(8, 0, 0))) { queryBuf.append(", @@transaction_isolation AS transaction_isolation"); } else { queryBuf.append(", @@tx_isolation AS transaction_isolation"); } queryBuf.append(", @@wait_timeout AS wait_timeout"); NativePacketPayload resultPacket = sendCommand(this.commandBuilder.buildComQuery(null, queryBuf.toString()), false, 0); Resultset rs = ((NativeProtocol) this.protocol).readAllResults(-1, false, resultPacket, false, null, new ResultsetFactory(Type.FORWARD_ONLY, null)); Field[] f = rs.getColumnDefinition().getFields(); if (f.length > 0) { ValueFactory vf = new StringValueFactory(this.propertySet); Row r; if ((r = rs.getRows().next()) != null) { for (int i = 0; i f.length; i++) { this.protocol.getServerSession().getServerVariables().put(f[i].getColumnLabel(), r.getValue(i, vf)); } } } } else { NativePacketPayload resultPacket = sendCommand(this.commandBuilder.buildComQuery(null, versionComment + "SHOW VARIABLES"), false, 0); Resultset rs = ((NativeProtocol) this.protocol).readAllResults(-1, false, resultPacket, false, null, new ResultsetFactory(Type.FORWARD_ONLY, null)); ValueFactory vf = new StringValueFactory(this.propertySet); Row r; while ((r = rs.getRows().next()) != null) { this.protocol.getServerSession().getServerVariables().put(r.getValue(0, vf), r.getValue(1, vf)); } } ``` 查询到这些数据之后,就可以做一些正常查询时候的设置与判断了
-
上滑加载中
推荐直播
-
 华为云码道Agent集成与鸿蒙实战
2026/08/11 周二 19:00-21:00
王一男-华为云码道产品规划专家;李炎-华为云码道产品专家;彭江敏-华为云鸿蒙端云一体化开发专家
本次直播带你解读华为云码道7月份产品新特性、新功能。更有专家演示码道Agent Space × 钉钉机器集成实战,从0到1打通消息通道;码道鸿蒙端云一体化实战,快速搭建员工签到系统。
回顾中 -
 华为云开发者AI素养直播课·第五期
2026/09/04 周五 16:00-18:00
林华鼎-华为云AI开发者运营负责人;蒋春阳-华为云AI开发者案例开发专家
本期直播内容: AI工具体验营 · 第5-8课连讲。Agent-Team 多智能体协作完成毕业设计实践
回顾中 -
 华为云开发者AI素养ClassRoom·第六期
2026/09/08 周二 19:00-20:00
樊渊-2026华为软件挑战赛冠军
高手来了:看软挑高手解析二维排样问题—从工业难题到算法突破
回顾中
热门标签