-
 华为云账号:Tianyi_Li班级:进阶班模型开发课
 -
华为云账号:Tianyi_Li班级:进阶班模型开发课
-
 前言:pycharm toolkit详细训练方式一、训练流程图(ModelArts、OBS、PC关系)二、准备工作1.安装pycharm 的modelarts插件及其设置到https://console.huaweicloud.com/modelarts/?region=cn-north-4#/dashboard 下载PyCharm Toolkit在刚刚安装汉化的地方安装本地插件:2.安装重启后在左上角工具栏会出现如下3.在华为云控制台里面我的凭证下创建访问密钥并下载4.将密钥填入modelarts插件5.安装obs步骤四:下载工具并初始化对象存储服务 OBS快速入门_华为云 (huaweicloud.com)用刚刚保存好的密钥登陆obs++并创建桶上传模型的数据集,将模型中的MINST_data文件夹上传即可三、Pycharm Toolkit训练6.使用pycharm下发训练任务,跑通模型7.成功运行如下图四、视频学习打卡
 -
前言:tensorflow的迁移方式有两种,分别为自动迁移和手动迁移,本篇文章主要详细讲述自动迁移的方式;一、获取迁移工具您也可以从昇腾社区获取,直接下载convert_tf2npu文件夹到Linux或Windows环境上任意目录即可;二、使用前准备要求原始脚本在GPU/CPU上跑通,精度收敛。要求原始脚本仅使用1.15官方API和Horovod官方API;原始脚本模块引入规范三、迁移操作 1.安装依赖库 2.训练脚本自动迁移 python main_win.py 原始脚本路径选择:训练模型的位置 输出迁移脚本路径:迁移后模型输出位置 输出分析报告路径:分析报告的输出位置 其他输入:可以不填 分析报告输出结果:四、学习视频打卡
-
如题
-
 1. 模型介绍2015年发表的ResNet是计算机视觉领域最重要的成果之一。ResNet网络提出的残差结构解决了之前的卷积视觉网络(如VGG)因为层数堆叠梯度消失的问题,并且成为之后卷积视觉网络最常见的组件。根据网络深度与参数量差异,ResNet有ResNet-18、ResNet-34、ResNet-50与ResNet-101等结构,在MindSpore ModelZoo均有实现。 ModelZoo也提供了ResNet在cifar10与ImageNet2012分类数据集上的适配脚本。2. 模型结构以最简单的ResNet-18为例,对应上面的原论文网络结构图,主干网络由四种卷积层组成:conv1(卷积层*1), conv2_x(maxpool层*1+卷积层*2*2), conv3_x(卷积层*2*2), conv4_x(卷积层*2*2), conv5_x(卷积层*2*2), 一共1+(1+2*2)+2*2+2*2+2*2=18层。 在src/resnet.py里面,ResNet-18是这样定义的:def resnet18(class_num=10): return ResNet(ResidualBlockBase, [2, 2, 2, 2], [64, 64, 128, 256], [64, 128, 256, 512], [1, 2, 2, 2], class_num, res_base=True) class ResNet(nn.Cell): def __init__(self, block, layer_nums, in_channels, out_channels, strides, num_classes, use_se=False, res_base=False):梳理一下ResNet类的参数:[2,2,2,2]即为conv2_x,conv3_x,conv4_x,conv5_x卷积层堆叠数,更深的ResNet结构如ResNet-34,ResNet-50堆叠了更多的卷积层。 [64, 64, 128, 256], [64, 128, 256, 512]是每一层输入与输出的通道数,[1, 2, 2, 2]是各层步长。 class_num是ResNet进行图片分类的输出类别数。 use_se=True可以使用改进版的SE-ResNet结构。 当构造ResNet-18与ResNet-34时,res_base=True使用与其他结构略不同的参数设置,如卷积算子与batchnorm:def _conv3x3(in_channel, out_channel, stride=1, use_se=False, res_base=False): weight_shape = (out_channel, in_channel, 3, 3) weight = Tensor(kaiming_normal(weight_shape, mode="fan_out", nonlinearity='relu')) if res_base: return nn.Conv2d(in_channel, out_channel, kernel_size=3, stride=stride, padding=1, pad_mode='pad', weight_init=weight) return nn.Conv2d(in_channel, out_channel, kernel_size=3, stride=stride, padding=0, pad_mode='same', weight_init=weight) def _bn(channel, res_base=False): if res_base: return nn.BatchNorm2d(channel, eps=1e-5, momentum=0.1, gamma_init=1, beta_init=0, moving_mean_init=0, moving_var_init=1) return nn.BatchNorm2d(channel, eps=1e-4, momentum=0.9, gamma_init=1, beta_init=0, moving_mean_init=0, moving_var_init=1)ResNet类内部使用_make_layer()方法分别构建四个了卷积层:self.layer1 = self._make_layer(block, layer_nums[0], in_channel=in_channels[0], out_channel=out_channels[0], stride=strides[0], use_se=self.use_se) self.layer2 = self._make_layer(block, layer_nums[1]...) self.layer3 = self._make_layer(block, layer_nums[2]...) self.layer4 = self._make_layer(block, layer_nums[3]...)_make_layer()将定义好的ResNet block堆叠起来,首先将每层按前后顺序添加进空列表layers,然后用nn.SequentialCell()组合封装多个Cell,在前向传播里输入会按这里的顺序进行运算:def _make_layer(self, block, layer_num, in_channel, out_channel, stride, use_se=False, se_block=False): layers = [] resnet_block = block(in_channel, out_channel, stride=stride, use_se=use_se) layers.append(resnet_block) ... for _ in range(1, layer_num): resnet_block = block(out_channel, out_channel, stride=1, use_se=use_se) layers.append(resnet_block) return nn.SequentialCell(layers)这里的ResNet block是ResNet最基础的结构单元, 也是ResNet最核心的算法贡献,在论文里的图示如下:MindSpore用ResidualBlockBase类封装了残差结构,在最后的relu(out)前加上残差量identity:class ResidualBlockBase(nn.Cell): ... def construct(self, x): identity = x out = self.conv1(x) out = self.bn1d(out) out = self.relu(out) out = self.conv2(out) out = self.bn2d(out) ... out = out + identity out = self.relu(out) return out各层网络结构定义结束之后,在ResNet类construct()里面定义前向传播:对输入图片进行第一层卷积,batch norm+relu,c1~c5是前面定义的四个layers输出。 最后一个卷积层的输出out的初始尺寸是(batchsize*num_channels*height*width), 通过ops.reducemean()算子取(2,3)维度(height*width)的均值,得到batchsize*num_channels*1*1的输出,然后使用ops.Flatten()得到batchsize*num_channels的输出。self.mean = ops.ReduceMean(keep_dims=True) ... def construct(self, x): x = self.conv1(x) x = self.bn1(x) x = self.relu(x) c1 = self.maxpool(x) c2 = self.layer1(c1) c3 = self.layer2(c2) c4 = self.layer3(c3) c5 = self.layer4(c4) out = self.mean(c5, (2, 3)) out = self.flatten(out) out = self.end_point(out) return outend_point()是使用nn.Dense()实现的全连接层,输入通道数取决于分类数量num_classes。self.end_point = _fc(out_channels[3], num_classes, use_se=self.use_se) ... def _fc(in_channel, out_channel, use_se=False): ... weight_shape = (out_channel, in_channel) weight = Tensor(kaiming_uniform(weight_shape, a=math.sqrt(5))) return nn.Dense(in_channel, out_channel, has_bias=True, weight_init=weight, bias_init=0)3. 训练过程训练超参数在config/resnet18_imagenet2012_config.yaml:# Training options optimizer: "Momentum" class_num: 1001 batch_size: 256 loss_scale: 1024 momentum: 0.9 weight_decay: 0.0001 epoch_size: 90 pretrain_epoch_size: 0 save_checkpoint: True save_checkpoint_epochs: 5 keep_checkpoint_max: 10 warmup_epochs: 0 lr_decay_mode: "linear" use_label_smooth: True label_smooth_factor: 0.1 lr_init: 0 lr_max: 0.8 lr_end: 0.0 lars_epsilon: 0.0 lars_coefficient: 0.001ResNet的训练脚本train.py首先定义了一些环境变量,数据集与训练参数:def train_net(): target = config.device_target ... ckpt_param_dict = load_pre_trained_checkpoint() dataset = create_dataset(dataset_path=config.data_path, do_train=True, batch_size=config.batch_size, train_image_size=config.train_image_size, eval_image_size=config.eval_image_size, target=target, distribute=config.run_distribute) step_size = dataset.get_dataset_size()在创造网络之后,定义损失函数、优化器与学习率:net = resnet(class_num=config.class_num) ... init_weight(net=net, param_dict=ckpt_param_dict) lr = Tensor(init_lr(step_size=step_size)) opt = Momentum(group_params, lr, config.momentum, loss_scale=config.loss_scale) loss = CrossEntropySmooth(sparse=True, reduction="mean", smooth_factor=config.label_smooth_factor, num_classes=config.class_num)最后定义训练回调函数LossCallBack类,开始训练。回调可以记录训练损失、时间,保存中间模型参数等:time_cb = TimeMonitor(data_size=step_size) loss_cb = LossCallBack(config.has_trained_epoch) cb = [time_cb, loss_cb] ... ckpt_cb = ModelCheckpoint(prefix="resnet", directory=ckpt_save_dir, config=config_ck) cb += [ckpt_cb] model.train(config.epoch_size - config.pretrain_epoch_size, dataset, callbacks=cb, sink_size=dataset.get_dataset_size(), dataset_sink_mode=dataset_sink_mode)使用bash脚本在Ascend平台进行训练,CONFIG_PATH为yaml配置文件路径:# distributed training bash run_distribute_train.sh [RANK_TABLE_FILE] [DATASET_PATH] [CONFIG_PATH] [PRETRAINED_CKPT_PATH](optional) # standalone training bash run_standalone_train.sh [DATASET_PATH] [CONFIG_PATH] [PRETRAINED_CKPT_PATH](optional)ResNet-18 + ImageNet2012 dataset示例训练输出:epoch: 1 step: 625, loss is 4.757934 epoch: 2 step: 625, loss is 4.0891967 epoch: 3 step: 625, loss is 3.9131956 epoch: 4 step: 625, loss is 3.5302577 epoch: 5 step: 625, loss is 3.597817 ...4. 推理过程推理脚本与训练不同的是加载了训练得到的ResNet预训练权重ckpt文件,在定义网络之后使用set_train(False)关闭训练模式。 MindSpore的eval()自带分类模型常用的top1/top5精度函数,所以在ImgaeNet2012数据集上定义Model对象时,只需要设定metrics={'top_1_accuracy', 'top_5_accuracy'}。@moxing_wrapper() def eval_net(): # load checkpoint param_dict = ms.load_checkpoint(config.checkpoint_file_path) ms.load_param_into_net(net, param_dict) net.set_train(False) # define model model = Model(net, loss_fn=loss, metrics={'top_1_accuracy', 'top_5_accuracy'}) # eval model res = model.eval(dataset)使用bash脚本在Ascend平台进行推理:# infer example bash run_eval.sh [DATASET_PATH] [CHECKPOINT_PATH] [CONFIG_PATH]ResNet-50 + cifar10 dataset示例推理输出, /resnet50_cifar10/train_parallel0/resnet-90_195.ckpt为保存的权重文件路径:result: {'acc': 0.91446314102564111} ckpt=~/resnet50_cifar10/train_parallel0/resnet-90_195.ckpt
 -
1、学习内容a、了解为什么要做模型迁移;b、了解TensorFlow AI模型自动和手工迁移方法;c、掌握如何进行模型迁移。2、手工迁移的学习截图观后总结:1、迁移前准备:事先准备好基于TensorFlow 1.15开发的训练模型以及配套的数据集,并要求在GPU或CPU上跑通,精度收敛,且达到预期精度和性能要求。同时记录相关精度和性能指标,用于后续在昇腾AI处理器进行精度和性能对比。2、主要介绍了基于TensorFlow 1.15 Estimator和Sess.run接口迁移。主要关注点:数据预处理、模型构建、运行配置及创建实例对象,用来后面模型训练。对于Sess.run还涉及到特殊配置的关闭和开启。
-
 描述适用的案例图像分类—ResNeSt理论与实践适用的数据集flowers-5-manifest(图像分类)flowers-5-raw-split(图像分类)10类常见美食生活垃圾分类花卉分类猫狗分类23类美食4类美食OBS原始数据集格式仅支持切分的情况your_local_path/flowers |- train --------------- 训练集 |- classA ------------- 类别A |- A_0.jpg |- A_1.jpg |- ... |- A_n.jpg |- classB ------------ 类别B |- B_0.jpg |- B_1.jpg |- ... |- B_n.jpg |- classC --------------- 类别C |- C_0.jpg |- C_1.jpg |- ... |- C_n.jpg 以此类推 ... |- eval --------------- 测试集 |- classA ------------- 类别A |- A_0.jpg |- A_1.jpg |- ... |- A_n.jpg |- classB ------------ 类别B |- B_0.jpg |- B_1.jpg |- ... |- B_n.jpg |- classC --------------- 类别C |- C_0.jpg |- C_1.jpg |- ... |- C_n.jpg 以此类推 ...概述MobileNetsV2是基于一个流线型的架构,它使用深度可分离的卷积来构建轻量级的深层神经网,此模型基于 MobileNetV2: Inverted Residuals and Linear Bottlenecks 中提出的模型结构实现。可以用图像分类任务,比如猫狗分类、花卉分类等等。用户提供一系列带有标注的数据集,该算法会载入在ImageNet-1000上的预训练模型,在用户数据集上做迁移学习。训练后生成的模型可直接在ModelArts平台部署为在线服务或批量服务,同时支持使用CPU、GPU或Ascend 310进行推理。训练算法基本信息适用场景:图像分类支持的框架引擎:Tensorflow-1.13.1-python3.6-horovod算法输入:ModelArts数据管理平台发布的数据集(数据集必须设置“训练验证比例”),建议用户以8:2或9:1的比例进行切分,即“训练验证比例”设置为0.8或0.9。在ImageNet上的预训练模型;训练参数说明名称默认值类型是否必填是否可修改描述task_typeimage_classification_v2string是否适用场景。model_namemobilenet_v2string是否模型名称。do_trainTruebool是否是否做训练,默认训练。do_eval_along_trainTruebool是否是否边训练边验证,默认值为True,表示边训练边验证。variable_updatehorovodstring是否参数更新方式,默认horovod。learning_rate_strategy0.002string是是训练的学习率策略。"10:0.001,20:0.0001"代表0-10个epoch学习率0.001,10-20epoch学习率0.0001。如果不指定epoch, 会根据验证精度情况自动调整学习率,并当精度没有明显提升时,训练停止。batch_size64int是是每步训练的图片数量(单卡)。eval_batch_size64int是是每步验证的图片数量(单卡)。evaluate_every_n_epochs1.0float是是每训练n个epoch做一次验证。save_model_secs60int是是保存模型的频率(单位:s)。save_summary_steps10int是是保存summary的频率(单位:步)。log_every_n_steps10int是是打印日志的频率(单位:步)。do_data_cleaningTruebool否是是否做数据清洗,数据格式异常会导致训练失败,建议开启,保证训练稳定性。数据量过大时,数据清洗可能耗时较久,可自行线下清洗(支持BMP、JPEG、PNG格式,RGB三通道)。建议用JPEG格式数据。默认开启,设置为False表示关闭。use_fp16Falsebool否否是否使用混合精度, 混合精度可以加速训练,但是可能会造成一点精度损失,默认关闭。xla_compileTruebool否是是否开启xla编译,加速训练,默认启用,设置为False表示关闭。data_formatNHWCstring否是输入数据类型,NHWC表示channel在最后,NCHW表示channel在最前,默认值NHWC,暂不支持NCHW。best_modelTruebool否是是否在训练过程中保存并使用精度最高的模型,而不是最新的模型。默认值True,保存最优模型。在一定误差范围内,最优模型会保存最新的高精度模型。设置为False表示关闭。训练输出文件训练完成后的输出文件如下: |- om |- model |- index |- customize_service_d310.py |- model |- variables |- variables.data-00000-of-00001 |- variables.index |- customize_service.py |- index |- config.json |- saved_model.pb |- frozen_graph |- insert_op_conf.cfg |- model.pb |- checkpoint |- model.ckpt-xxx |- ... |- best_checkpoint |- best_model.ckpt-xxx |- ... |- events... |- graph.pbtxtAscend 310推理模型转换转换模板:TF-FrozenGraph-To-Ascend-C32转换输入目录:选择“训练输出目录”中的frozen_graph转换输出目录:选择“训练输出目录”中的om/model输入张量形状:images:1,224,224,3输入数据格式:NHWC转换输出节点:logits:0其他参数均使用默认值。模型导入从模板中选择:ARM-Ascend模板模型目录:选择“训练输出目录”中的om/model输入输出模式:预置图像处理模式GPU/CPU推理推理配置文件“model/config.json”,默认使用CPU推理镜像(runtime:tf1.xx-python3.x-cpu)。若使用GPU推理,导入模型之前需修改“model/config.json”文件,将runtime字段修改为“tf1.xx-python3.x-gpu”。交付交付方式华为云ModelArts交付区域华北-北京一、华北-北京四、华东-上海一、华南-广州、中国-香港
 -
描述适用的案例图像分类—ResNeSt理论与实践适用的数据集flowers-5-manifest(图像分类)flowers-5-raw-split(图像分类)10类常见美食生活垃圾分类花卉分类猫狗分类23类美食4类美食OBS原始数据集格式仅支持切分的情况your_local_path/flowers |- train --------------- 训练集 |- classA ------------- 类别A |- A_0.jpg |- A_1.jpg |- ... |- A_n.jpg |- classB ------------ 类别B |- B_0.jpg |- B_1.jpg |- ... |- B_n.jpg |- classC --------------- 类别C |- C_0.jpg |- C_1.jpg |- ... |- C_n.jpg 以此类推 ... |- eval --------------- 测试集 |- classA ------------- 类别A |- A_0.jpg |- A_1.jpg |- ... |- A_n.jpg |- classB ------------ 类别B |- B_0.jpg |- B_1.jpg |- ... |- B_n.jpg |- classC --------------- 类别C |- C_0.jpg |- C_1.jpg |- ... |- C_n.jpg 以此类推 ...概述MobileNetsV2是基于一个流线型的架构,它使用深度可分离的卷积来构建轻量级的深层神经网,此模型基于 MobileNetV2: Inverted Residuals and Linear Bottlenecks 中提出的模型结构实现。可以用图像分类任务,比如猫狗分类、花卉分类等等。用户提供一系列带有标注的数据集,该算法会载入在ImageNet-1000上的预训练模型,在用户数据集上做迁移学习。训练后生成的模型可直接在ModelArts平台部署为在线服务或批量服务,同时支持使用CPU、GPU或Ascend 310进行推理。训练算法基本信息适用场景:图像分类支持的框架引擎:Tensorflow-1.13.1-python3.6-horovod算法输入:ModelArts数据管理平台发布的数据集(数据集必须设置“训练验证比例”),建议用户以8:2或9:1的比例进行切分,即“训练验证比例”设置为0.8或0.9。在ImageNet上的预训练模型;训练参数说明名称默认值类型是否必填是否可修改描述task_typeimage_classification_v2string是否适用场景。model_namemobilenet_v2string是否模型名称。do_trainTruebool是否是否做训练,默认训练。do_eval_along_trainTruebool是否是否边训练边验证,默认值为True,表示边训练边验证。variable_updatehorovodstring是否参数更新方式,默认horovod。learning_rate_strategy0.002string是是训练的学习率策略。"10:0.001,20:0.0001"代表0-10个epoch学习率0.001,10-20epoch学习率0.0001。如果不指定epoch, 会根据验证精度情况自动调整学习率,并当精度没有明显提升时,训练停止。batch_size64int是是每步训练的图片数量(单卡)。eval_batch_size64int是是每步验证的图片数量(单卡)。evaluate_every_n_epochs1.0float是是每训练n个epoch做一次验证。save_model_secs60int是是保存模型的频率(单位:s)。save_summary_steps10int是是保存summary的频率(单位:步)。log_every_n_steps10int是是打印日志的频率(单位:步)。do_data_cleaningTruebool否是是否做数据清洗,数据格式异常会导致训练失败,建议开启,保证训练稳定性。数据量过大时,数据清洗可能耗时较久,可自行线下清洗(支持BMP、JPEG、PNG格式,RGB三通道)。建议用JPEG格式数据。默认开启,设置为False表示关闭。use_fp16Falsebool否否是否使用混合精度, 混合精度可以加速训练,但是可能会造成一点精度损失,默认关闭。xla_compileTruebool否是是否开启xla编译,加速训练,默认启用,设置为False表示关闭。data_formatNHWCstring否是输入数据类型,NHWC表示channel在最后,NCHW表示channel在最前,默认值NHWC,暂不支持NCHW。best_modelTruebool否是是否在训练过程中保存并使用精度最高的模型,而不是最新的模型。默认值True,保存最优模型。在一定误差范围内,最优模型会保存最新的高精度模型。设置为False表示关闭。训练输出文件训练完成后的输出文件如下: |- om |- model |- index |- customize_service_d310.py |- model |- variables |- variables.data-00000-of-00001 |- variables.index |- customize_service.py |- index |- config.json |- saved_model.pb |- frozen_graph |- insert_op_conf.cfg |- model.pb |- checkpoint |- model.ckpt-xxx |- ... |- best_checkpoint |- best_model.ckpt-xxx |- ... |- events... |- graph.pbtxtAscend 310推理模型转换转换模板:TF-FrozenGraph-To-Ascend-C32转换输入目录:选择“训练输出目录”中的frozen_graph转换输出目录:选择“训练输出目录”中的om/model输入张量形状:images:1,224,224,3输入数据格式:NHWC转换输出节点:logits:0其他参数均使用默认值。模型导入从模板中选择:ARM-Ascend模板模型目录:选择“训练输出目录”中的om/model输入输出模式:预置图像处理模式GPU/CPU推理推理配置文件“model/config.json”,默认使用CPU推理镜像(runtime:tf1.xx-python3.x-cpu)。若使用GPU推理,导入模型之前需修改“model/config.json”文件,将runtime字段修改为“tf1.xx-python3.x-gpu”。交付交付方式华为云ModelArts交付区域华北-北京一、华北-北京四、华东-上海一、华南-广州、中国-香港
-
### 一、概述 算子开发通常包括以下步骤: - 算子分析 - 创建算子工程 - 算子实现 - 编译 - UT测试 - ST测试 - 部署 下面介绍使用MindStudio完成一个简单TBE算子的整个开发过程。我们可以从 _[这里](https://www.hiascend.com/software/mindstudio/download)_ 获取MindStudio的版本,CANN的版本需要跟MindStudio配套。 注意:如果图片看不见,可以直接到[这里](https://gitee.com/ascend/mindstudio-samples/wikis/%E4%B8%9A%E5%8A%A1%E5%BC%80%E5%8F%91%E6%8C%87%E5%AF%BC/%E7%AE%97%E5%AD%90%E5%BC%80%E5%8F%91%E6%8C%87%E5%AF%BC)查看原文; ### 二、算子分析 进行算子开发前,开发者应首先进行算子分析,算子分析包含:明确算子的功能及数学表达式,选择算子开发方式(DSL方式或者TIK方式),最后细化并明确算子规格,分析流程如下所示: 图4-1 算子分析流程  如何分析可以参考[算子分析](https://support.huawei.com/enterprise/zh/doc/EDOC1100234139/f43ef24b) 这里我们举例开发一个支持计算两个输入tensor的和的算子Add。 ### 三、创建算子工程 1.启动MindStudio,在欢迎界面点击New Project按钮,弹出创建工程的界面; 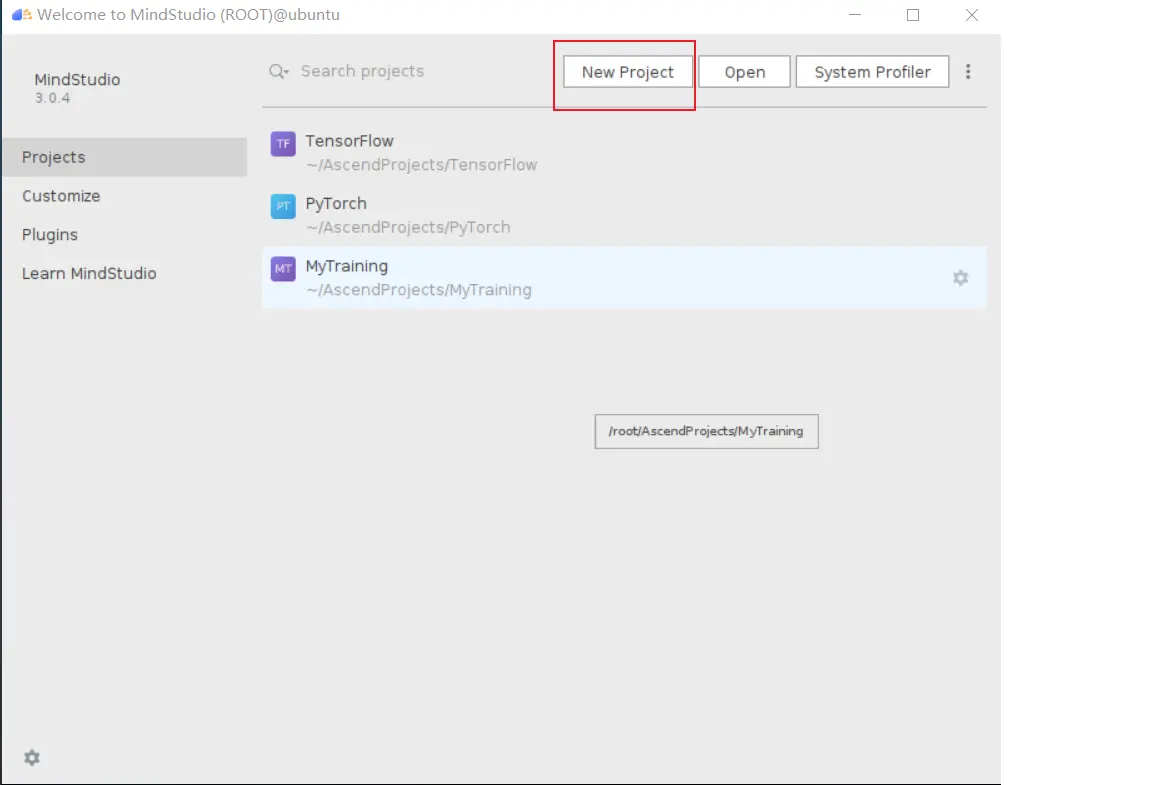 2.左边的选项卡选择Ascend Operator,右边界面中Name编辑框填写Add,点击Next按钮; 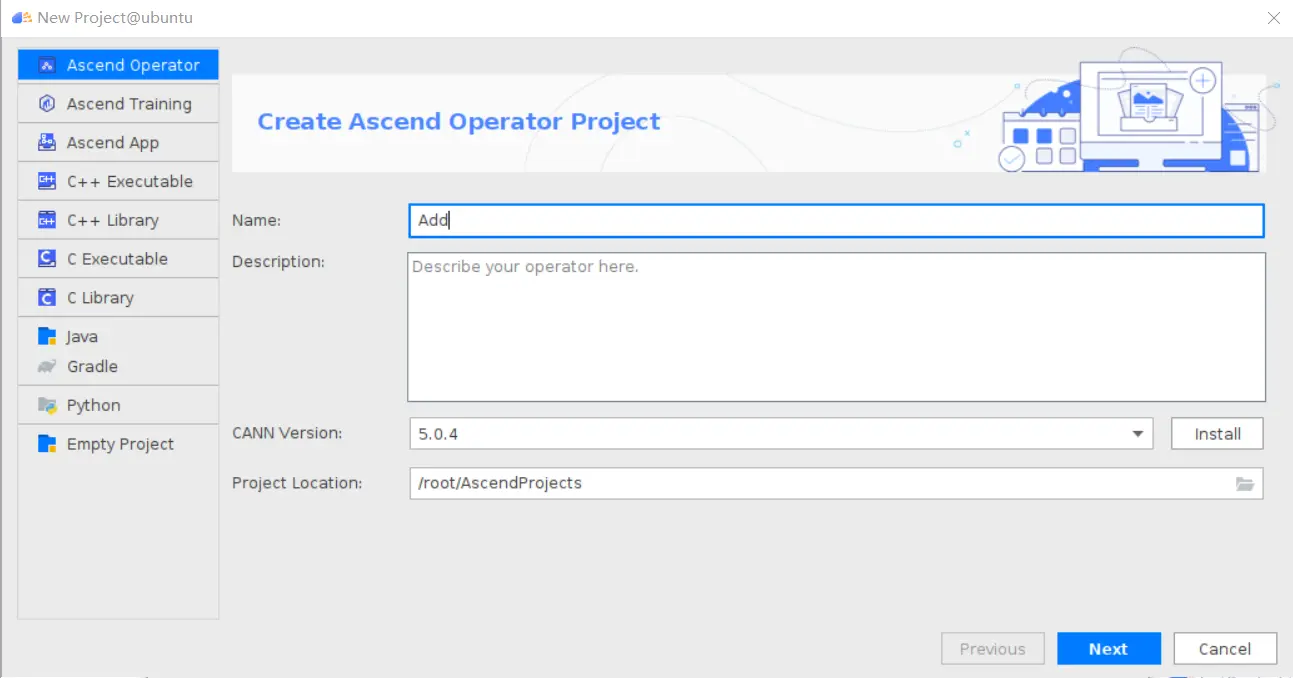 3.填写相关参数,New Operator选择Empty Template,表示创建一个空的工程模板;Operator Type填Add;Plugin Framework选择TensorFlow,表明该算子是原始框架为TensorFlow的自定义算子;Unit Type根据实际情况选择,如果算子要支持运行在Ascend310芯片上,那么就选择Ascend310-AI Core,可以多选其他芯片类型,这里使用训练服务器,所以勾选Ascend910A-AI Core;点击Finish按钮,会生成一个模板工程。 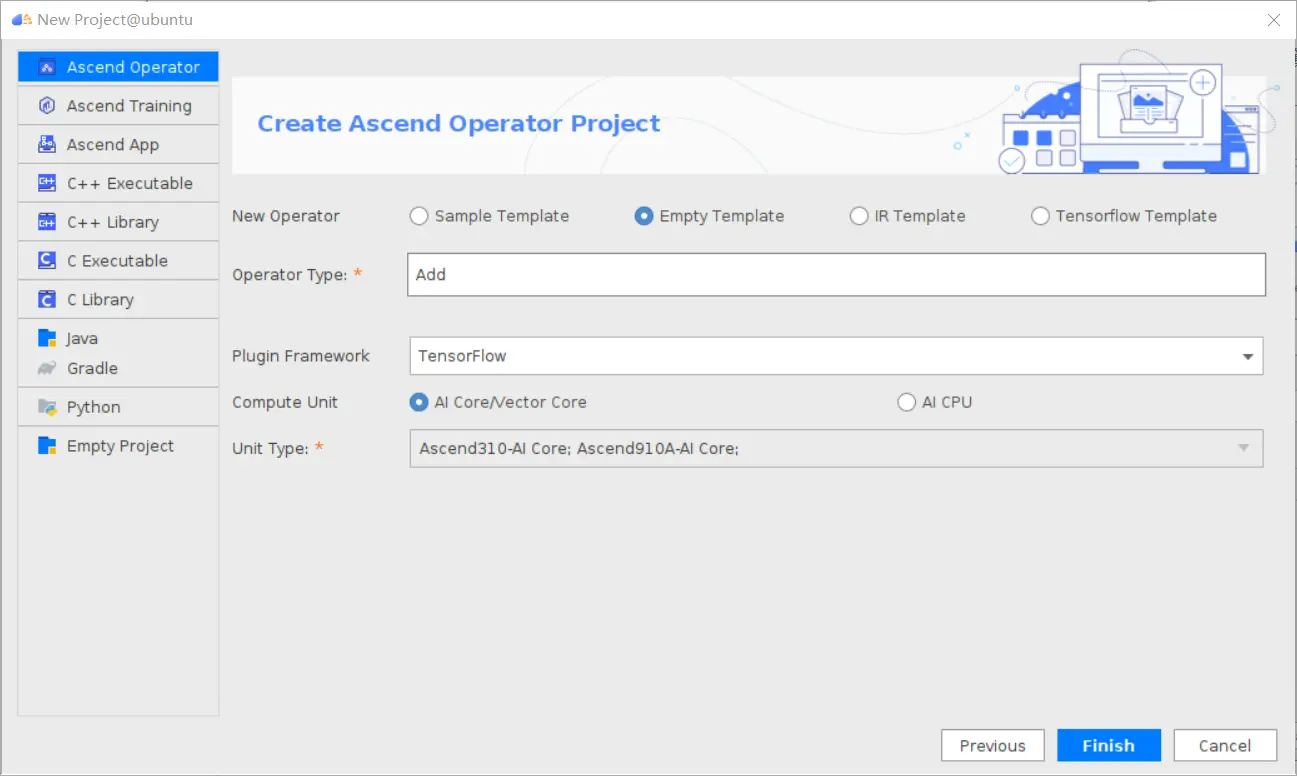 工程目录下主要包括算子原型文件、实现文件、信息库文件和插件适配文件。算子的实现开发主要是针对这四类文件进行开发。 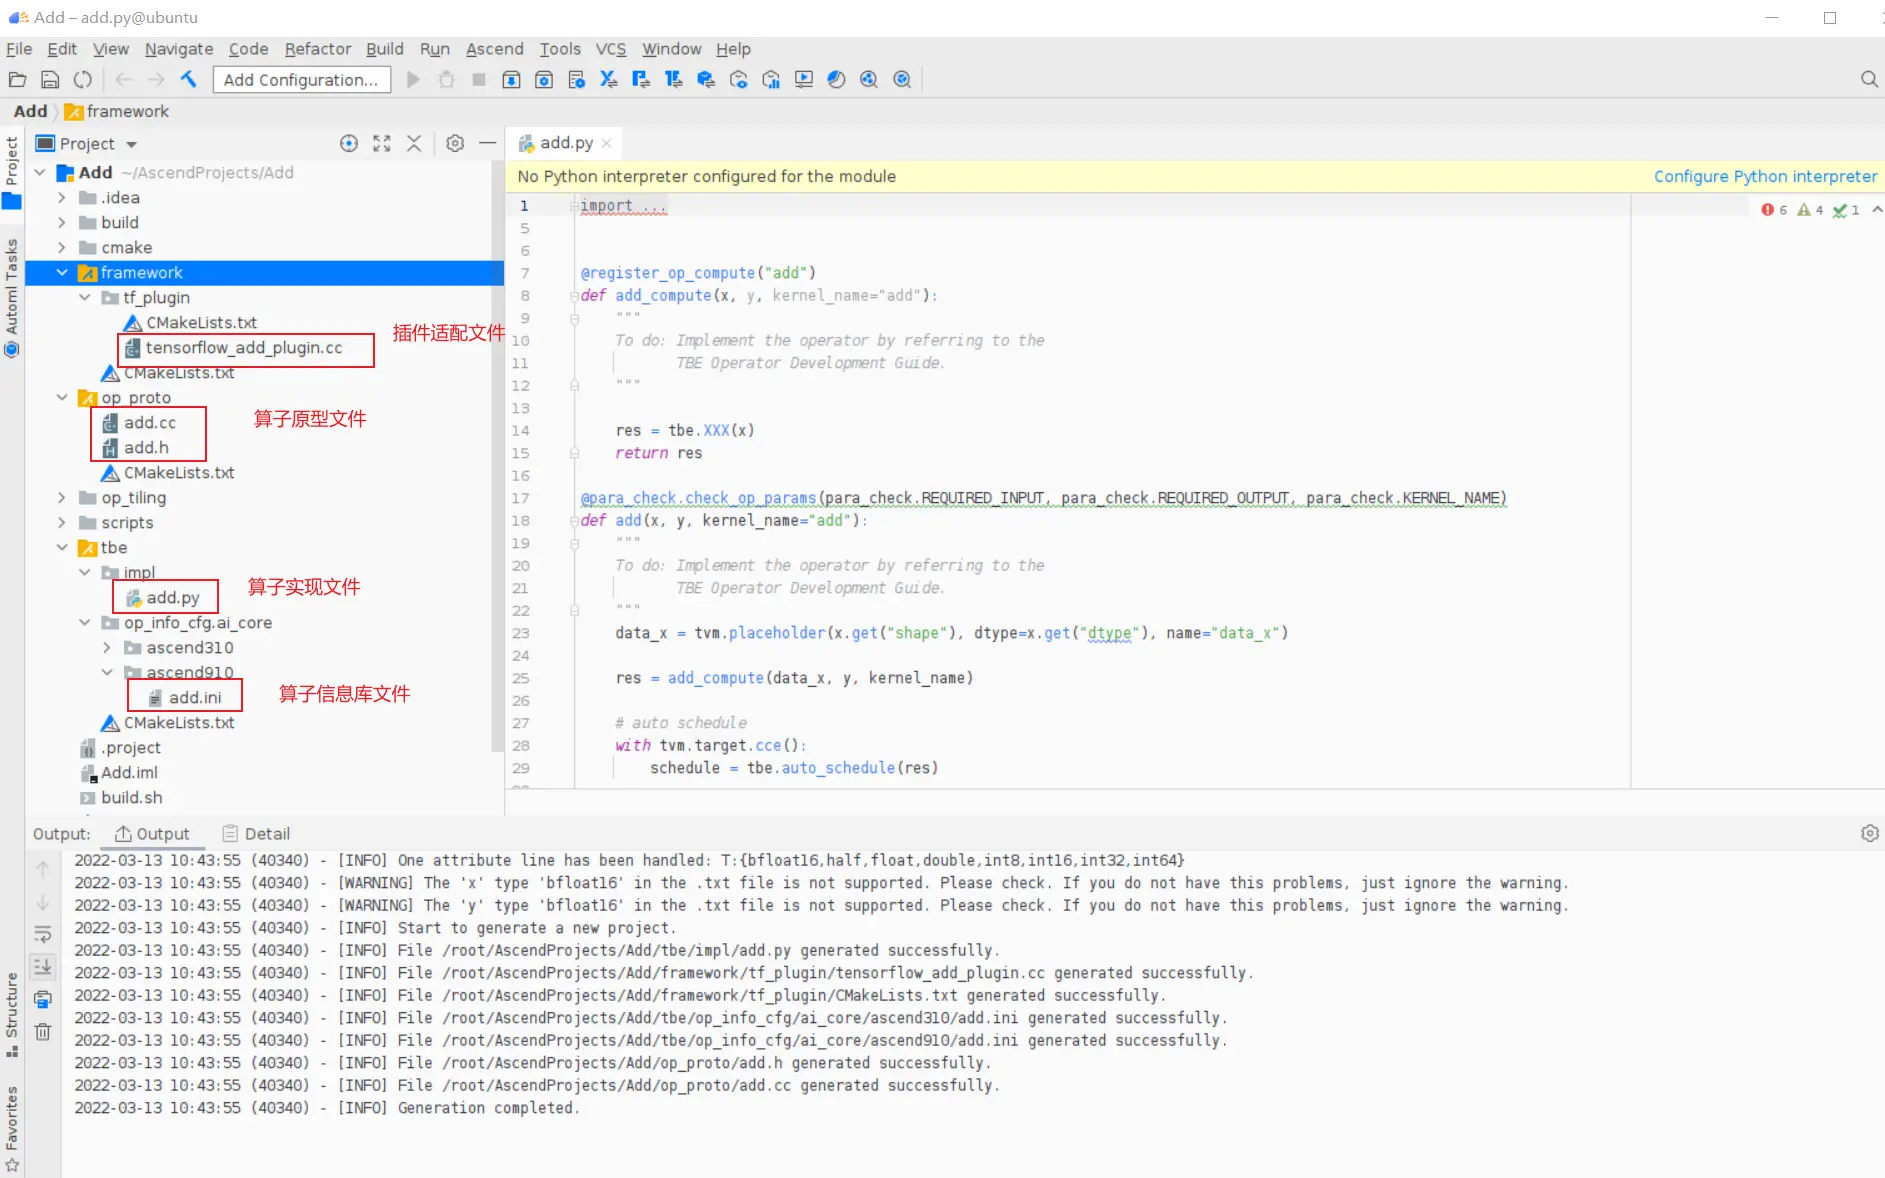 ### 四、算子实现 1. 算子原型定义 算子原型定义规定了在昇腾AI处理器上可运行算子的约束,主要体现算子的数学含义,包含定义算子输入、输出、属性和取值范围,基本参数的校验和shape的推导,原型定义的信息会被注册到GE的算子原型库中。离线模型转换时,GE会调用算子原型库的校验接口进行基本参数的校验,校验通过后,会根据原型库中的推导函数推导每个节点的输出shape与dtype,进行输出tensor的静态内存的分配。 Add算子原型头文件add.h: ``` /** * Copyright (c) Huawei Technologies Co., Ltd. 2019-2020. All rights reserved. * This program is free software; you can redistribute it and/or modify * it under the terms of the Apache License Version 2.0.You may not use this file except in compliance with the License. * This program is distributed in the hope that it will be useful, * but WITHOUT ANY WARRANTY; without even the implied warranty of * MERCHANTABILITY or FITNESS FOR A PARTICULAR PURPOSE. See the * Apache License for more details at * http://www.apache.org/licenses/LICENSE-2.0 * * Description: Huawei Code * * Author: Huawei * * Create: 2020-01-01 * */ #ifndef GE_OPS_OP_PROTO_ADD_H_ #define GE_OPS_OP_PROTO_ADD_H_ #include "graph/operator_reg.h" namespace ge { REG_OP(Add) .INPUT(x1, TensorType({DT_FLOAT, DT_INT32, DT_INT64, DT_FLOAT16, DT_INT16, DT_INT8, DT_UINT8, DT_DOUBLE, DT_COMPLEX128, DT_COMPLEX64, DT_STRING})) .INPUT(x2, TensorType({DT_FLOAT, DT_INT32, DT_INT64, DT_FLOAT16, DT_INT16, DT_INT8, DT_UINT8, DT_DOUBLE, DT_COMPLEX128, DT_COMPLEX64, DT_STRING})) .OUTPUT(y, TensorType({DT_FLOAT, DT_INT32, DT_INT64, DT_FLOAT16, DT_INT16, DT_INT8, DT_UINT8, DT_DOUBLE, DT_COMPLEX128, DT_COMPLEX64, DT_STRING})) .OP_END_FACTORY_REG(Add) } #endif //GE_OPS_OP_PROTO_ADD_H_ ``` Add算子原型源文件add.cc: ``` /** * Copyright (c) Huawei Technologies Co., Ltd. 2019-2020. All rights reserved. * This program is free software; you can redistribute it and/or modify * it under the terms of the Apache License Version 2.0.You may not use this file except in compliance with the License. * This program is distributed in the hope that it will be useful, * but WITHOUT ANY WARRANTY; without even the implied warranty of * MERCHANTABILITY or FITNESS FOR A PARTICULAR PURPOSE. See the * Apache License for more details at * http://www.apache.org/licenses/LICENSE-2.0 * * Description: Huawei Code * * Author: Huawei * * Create: 2020-01-01 * */ #include "./add.h" #include #include namespace ge { bool InferShapeAndTypeAdd(Operator &op, const string &inputName1, const string &inputName2, const string &outputName) { TensorDesc vOutputDesc = op.GetOutputDescByName(outputName.c_str()); DataType inputDtype = op.GetInputDescByName(inputName1.c_str()).GetDataType(); Format inputFormat = op.GetInputDescByName(inputName1.c_str()).GetFormat(); // 针对shape维度大小进行交换 ge::Shape shapeX = op.GetInputDescByName(inputName1.c_str()).GetShape(); ge::Shape shapeY = op.GetInputDescByName(inputName2.c_str()).GetShape(); std::vector dimsX = shapeX.GetDims(); std::vector dimsY = shapeY.GetDims(); if (dimsX.size() dimsY.size()) { std::vector dimsTmp = dimsX; dimsX = dimsY; dimsY = dimsTmp; } // 对小的shape进行1补齐 if (dimsX.size() != dimsY.size()) { int dec = dimsX.size() - dimsY.size(); for (int i = 0; i dec; i++) { dimsY.insert(dimsY.begin(), (int64_t)1); } } // 设置输出的shape维度 std::vector dimVec; for (size_t i = 0; i dimsX.size(); i++) { if ((dimsX[i] != dimsY[i]) && (dimsX[i] != 1) && (dimsY[i] != 1)) { return false; } int64_t dims = dimsX[i] > dimsY[i] ? dimsX[i] : dimsY[i]; dimVec.push_back(dims); } ge::Shape outputShape = ge::Shape(dimVec); vOutputDesc.SetShape(outputShape); vOutputDesc.SetDataType(inputDtype); vOutputDesc.SetFormat(inputFormat); op.UpdateOutputDesc(outputName.c_str(), vOutputDesc); return true; } // ----------------Add------------------- IMPLEMT_VERIFIER(Add, AddVerify) { if (op.GetInputDescByName("x1").GetDataType() != op.GetInputDescByName("x2").GetDataType()) { return GRAPH_FAILED; } return GRAPH_SUCCESS; } // Obtains the processing function of the output tensor description. IMPLEMT_COMMON_INFERFUNC(AddInferShape) { if (InferShapeAndTypeAdd(op, "x1", "x2", "y")) { return GRAPH_SUCCESS; } return GRAPH_FAILED; } // Registered inferfunction COMMON_INFER_FUNC_REG(Add, AddInferShape); // Registered verify function VERIFY_FUNC_REG(Add, AddVerify); // ----------------Add------------------- } // namespace ge ``` 更多可以参考[算子原型定义](https://support.huawei.com/enterprise/zh/doc/EDOC1100234139?section=j00s) 2. 算子代码实现 算子计算逻辑及调度的实现。 Add算子实现文件add.py: ``` #!/usr/bin/env python # -*- coding:utf-8 -*- """ Copyright (C) 2019. Huawei Technologies Co., Ltd. All rights reserved. This program is free software; you can redistribute it and/or modify it under the terms of the Apache License Version 2.0.You may not use this file except in compliance with the License. This program is distributed in the hope that it will be useful, but WITHOUT ANY WARRANTY; without even the implied warranty of MERCHANTABILITY or FITNESS FOR A PARTICULAR PURPOSE. See the Apache License for more details at http://www.apache.org/licenses/LICENSE-2.0 add """ from __future__ import absolute_import import tbe.dsl as tbe from functools import reduce from tbe import tvm from tbe.common.register import register_op_compute from tbe.common.utils import para_check from tbe.common.utils import shape_util # General limitation of the reduce size for input shape: 2**31 SHAPE_SIZE_LIMIT = 2147483648 # pylint: disable=locally-disabled,too-many-arguments,unused-argument @register_op_compute("Add", op_mode="dynamic", support_fusion=True) def add_compute(input_x, input_y, output_z, kernel_name="add"): """ calculating data's add, c = a + b Parameters ---------- input_x: TVM tensor the placeholder of first input data input_y: TVM tensor the placeholder of second input data output_data: dict shape and dtype of output, should be broadcast shape and type as input kernel_name: str cce kernel name, default value is add Returns ------- res : output of the data's add """ shape_x = shape_util.shape_to_list(input_x.shape) shape_y = shape_util.shape_to_list(input_y.shape) shape_x, shape_y, shape_max = \ shape_util.broadcast_shapes(shape_x, shape_y, param_name_input1="input_x", param_name_input2="input_y") shape_size = reduce(lambda x, y: x * y, shape_max[:]) if shape_size > SHAPE_SIZE_LIMIT: raise RuntimeError("the shape is too large to calculate") input_x = tbe.broadcast(input_x, shape_max) input_y = tbe.broadcast(input_y, shape_max) res = tbe.vadd(input_x, input_y) return res @para_check.check_op_params(para_check.REQUIRED_INPUT, para_check.REQUIRED_INPUT, para_check.REQUIRED_OUTPUT, para_check.KERNEL_NAME) def add(input_x, input_y, output_z, kernel_name="add"): """ algorithm: add calculating data's add, c = a + b Parameters ---------- input_x : dict shape and dtype of first input, only support float16, float32, int32 input_y : dict shape and dtype of second input, only support float16, float32, int32 output_z: dict shape and dtype of output, should be broadcast shape and type as input kernel_name : str cce kernel name, default value is add Returns ------- None """ shape_x = input_x.get("shape") shape_y = input_y.get("shape") check_tuple = ("float16", "float32", "int32") input_data_type = input_x.get("dtype").lower() para_check.check_dtype(input_data_type, check_tuple, param_name="input_x") shape_x, shape_y, shape_max = \ shape_util.broadcast_shapes(shape_x, shape_y, param_name_input1="input_x", param_name_input2="input_y") if shape_x[-1] == 1 and shape_y[-1] == 1 and shape_max[-1] == 1: shape_x = shape_x if len(shape_x) == 1 else shape_x[:-1] shape_y = shape_y if len(shape_y) == 1 else shape_y[:-1] shape_max = shape_max if len(shape_max) == 1 else shape_max[:-1] data_x = tvm.placeholder(shape_x, name="data_1", dtype=input_data_type) data_y = tvm.placeholder(shape_y, name="data_2", dtype=input_data_type) res = add_compute(data_x, data_y, output_z, kernel_name) with tvm.target.cce(): schedule = tbe.auto_schedule(res) config = {"print_ir": False, "name": kernel_name, "tensor_list": (data_x, data_y, res)} tbe.build(schedule, config) ``` 3. 算子信息库定义 算子信息库文件用于将算子的相关信息注册到算子信息库中,包括算子的输入输出dtype、format以及输入shape信息。离线模型转换时,FE会根据算子信息库中的算子信息做基本校验,判断是否需要为算子插入合适的转换节点,并根据算子信息库中信息找到对应的算子实现文件进行编译,生成算子二进制文件进行执行。 算子信息库文件add.ini: ``` [Add] input0.name=x1 input0.dtype=float16,float16,float16,float16,float,float,float,float,int32,int32,int32,int32 input0.shape=all input0.paramType=required input0.format=NCHW,NC1HWC0,NHWC,ND,NCHW,NC1HWC0,NHWC,ND,NCHW,NC1HWC0,NHWC,ND input1.name=x2 input1.dtype=float16,float16,float16,float16,float,float,float,float,int32,int32,int32,int32 input1.shape=all input1.paramType=required input1.format=NCHW,NC1HWC0,NHWC,ND,NCHW,NC1HWC0,NHWC,ND,NCHW,NC1HWC0,NHWC,ND output0.name=y output0.dtype=float16,float16,float16,float16,float,float,float,float,int32,int32,int32,int32 output0.shape=all output0.paramType=required output0.format=NCHW,NC1HWC0,NHWC,ND,NCHW,NC1HWC0,NHWC,ND,NCHW,NC1HWC0,NHWC,ND opFile.value=add opInterface.value=add ``` 更多参考[算子信息库定义](https://support.huawei.com/enterprise/zh/doc/EDOC1100234139?section=j01i) 4. 算子适配 基于第三方框架(TensorFlow/Caffe)进行自定义算子开发的场景,开发人员需要进行插件的开发,将基于第三方框架的算子属性映射成适配昇腾AI处理器的算子属性。 Add算子插件适配文件tensorflow_add_plugin.cc: ``` /** * Copyright (c) Huawei Technologies Co., Ltd. 2019-2020. All rights reserved. * This program is free software; you can redistribute it and/or modify * it under the terms of the Apache License Version 2.0.You may not use this file except in compliance with the License. * This program is distributed in the hope that it will be useful, * but WITHOUT ANY WARRANTY; without even the implied warranty of * MERCHANTABILITY or FITNESS FOR A PARTICULAR PURPOSE. See the * Apache License for more details at * http://www.apache.org/licenses/LICENSE-2.0 * * Description: Huawei Code * * Author: Huawei * * Create: 2020-01-01 * */ #include "register/register.h" namespace domi { REGISTER_CUSTOM_OP("Add") .FrameworkType(TENSORFLOW) .OriginOpType({ge::AscendString("Add")}) .ParseParamsByOperatorFn(AutoMappingByOpFn) .ImplyType(ImplyType::TVM); } // namespace domi ``` 更多参考[算子适配插件开发](https://support.huawei.com/enterprise/zh/doc/EDOC1100234139?section=j01k) ### 五、编译 点击Build->Edit Build Configuration..菜单,弹出的对话框中选择Local Build,Target Architecture选择AI服务器的架构,我们这里的服务器是鲲鹏的训练服务器,所以选aarch64(需要提前安装好对应版本的CANN),点击Build按钮。  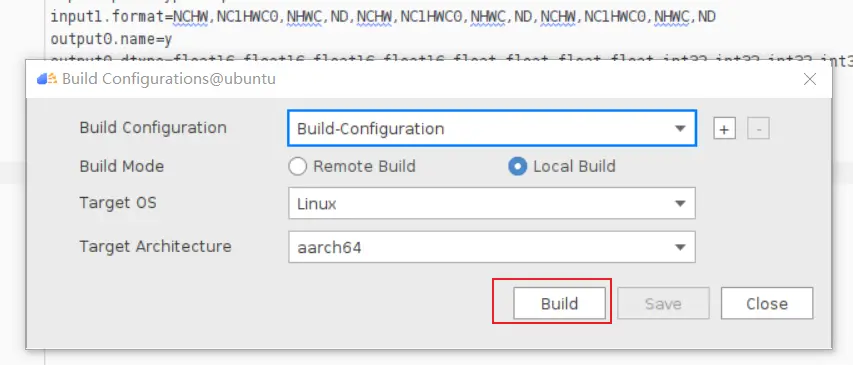 查看输出窗口,看到编译成功,且在cmake-build目录下生成了自定义算子Run包custom_opp_Linux_x86_64.run,该run包可以单独拿到其他开发或者运行环境部署。  ### 六、UT测试 我们可以对算子的实现进行UT单元测试,验证算子实现是否正确。算子的UT是通过在开发机器上将算子运行在昇腾芯片的仿真器来验证的。 在工程树的根目录鼠标右键,弹出的菜单中选择New Cases->TBE UT Case,弹出的窗口中Operator Name选择add算子,点击OK,创建UT文件模板。 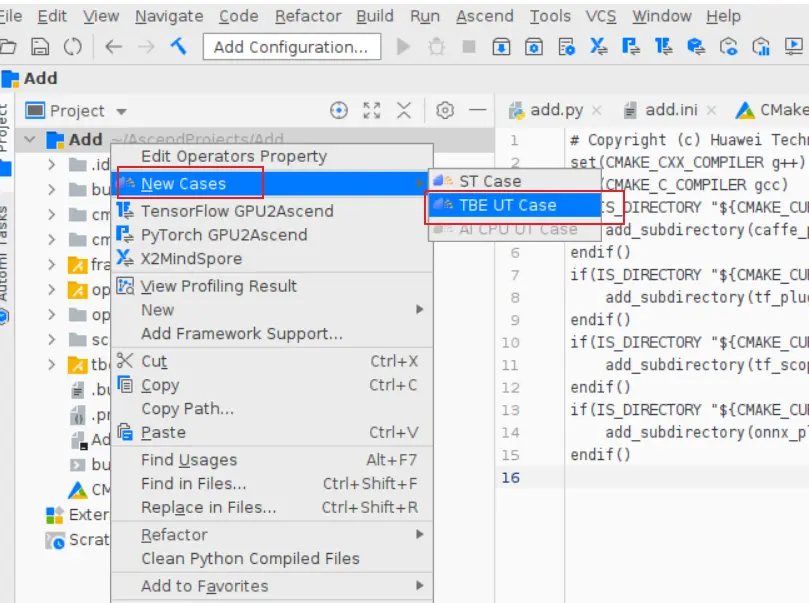 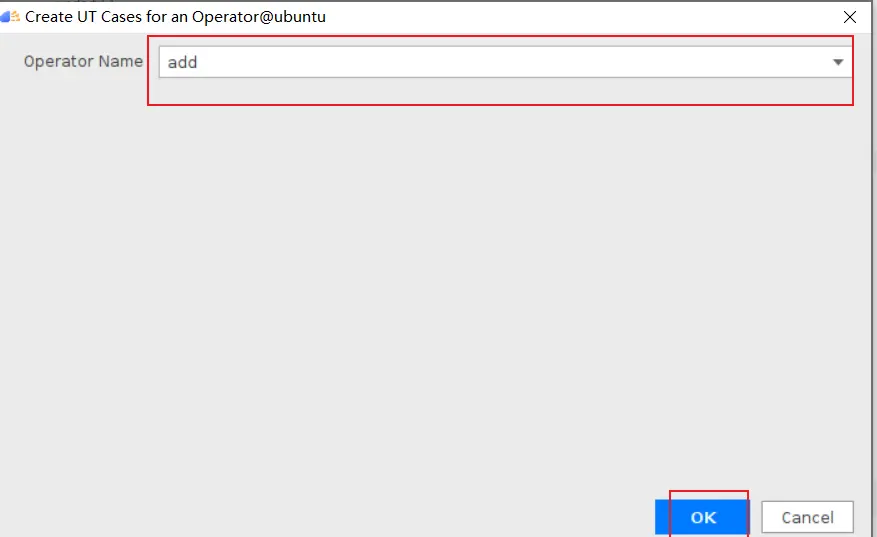 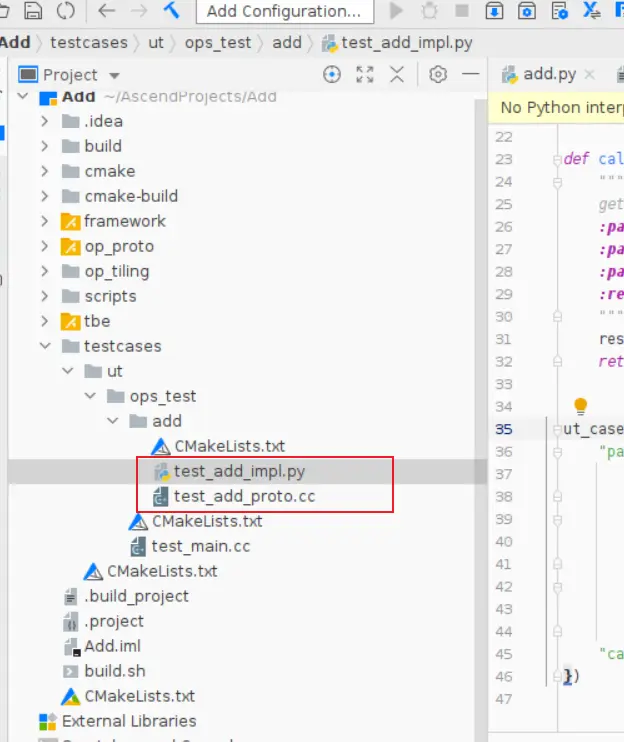 针对test_add_impl.py文件,我们可以修改这个文件增加算子实现的UT测试用例代码。 test_add_impl.py内容: ``` #!/usr/bin/env python # -*- coding:utf-8 -*- """ Copyright (C) 2020. Huawei Technologies Co., Ltd. All rights reserved. This program is free software; you can redistribute it and/or modify it under the terms of the Apache License Version 2.0.You may not use this file except in compliance with the License. This program is distributed in the hope that it will be useful, but WITHOUT ANY WARRANTY; without even the implied warranty of MERCHANTABILITY or FITNESS FOR A PARTICULAR PURPOSE. See the Apache License for more details at http://www.apache.org/licenses/LICENSE-2.0 test_add_impl """ from op_test_frame.ut import BroadcastOpUT ut_case = BroadcastOpUT("Add") def calc_expect_func(input_x, input_y, output_z): """ get expect output :param input_x:tensor x :param input_y: tensor y :param output_z: output placeholder :return:output tensor """ res = input_x["value"] + input_y["value"] return [res, ] ut_case.add_precision_case("all", { "params": [{"dtype": "float16", "format": "ND", "ori_format": "ND", "ori_shape": (32,), "shape": (32,), "param_type": "input"}, {"dtype": "float16", "format": "ND", "ori_format": "ND", "ori_shape": (32,), "shape": (32,), "param_type": "input"}, {"dtype": "float16", "format": "ND", "ori_format": "ND", "ori_shape": (32,), "shape": (32,), "param_type": "output"}], "calc_expect_func": calc_expect_func }) ``` 修改完成后,鼠标右键点击test_add_impl.py文件,弹出的菜单中选择Run TBE Operator,弹出配置窗口,SoC Version选择Ascend910,Target 选择Simulator_TMModel,Operator Name选择add,Case Names中全选用例,然后点击Run。查看输出窗口,可以看到用例是否都跑成功了。  算子原型也可以进行UT测试,修改test_add_proto.cpp如下: ``` #include gtest.h> #include #include "add.h" class AddTest : public testing::Test { protected: static void SetUpTestCase() { std::cout "add test SetUp" std::endl; } static void TearDownTestCase() { std::cout "add test TearDown" std::endl; } }; TEST_F(AddTest, add_test_case_1) { // define op ge::op::Add addOp; ge::TensorDesc tensorDesc; ge::Shape shape({2, 3, 4}); tensorDesc.SetDataType(ge::DT_FLOAT16); tensorDesc.SetShape(shape); tensorDesc.SetOriginShape(shape); // update op input addOp.UpdateInputDesc("x1", tensorDesc); addOp.UpdateInputDesc("x2", tensorDesc); // call InferShapeAndType function auto ret = addOp.InferShapeAndType(); EXPECT_EQ(ret, ge::GRAPH_SUCCESS); // compare dtype and shape of op output auto outputDesc = addOp.GetOutputDescByName("y"); EXPECT_EQ(outputDesc.GetDataType(), ge::DT_FLOAT16); std::vector expectedOutputShape = {2, 3, 4}; EXPECT_EQ(outputDesc.GetShape().GetDims(), expectedOutputShape); } ``` ### 七、ST测试 在工程树的根目录鼠标右键,弹出的菜单中选择New Cases->ST Case,弹出的窗口中Operator Name选择add算子,SoC Version选择ascend910,点击OK。 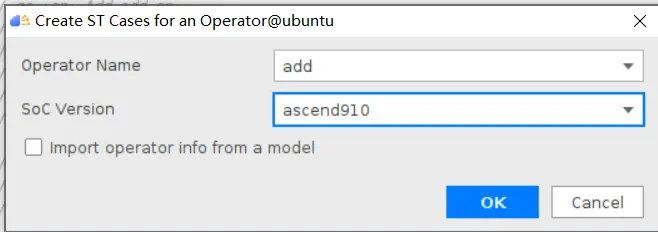 创建ST用例json文件。 默认生成了一个ST用例,修改输入输出的shape为[8,16,8,16]。点击Run按钮,弹出运行配置窗口,选择Local Execute,勾选用例,点击Run按钮。在最下方的Run窗口,可以看到运行结果,所有的用例是否都运行通过了。 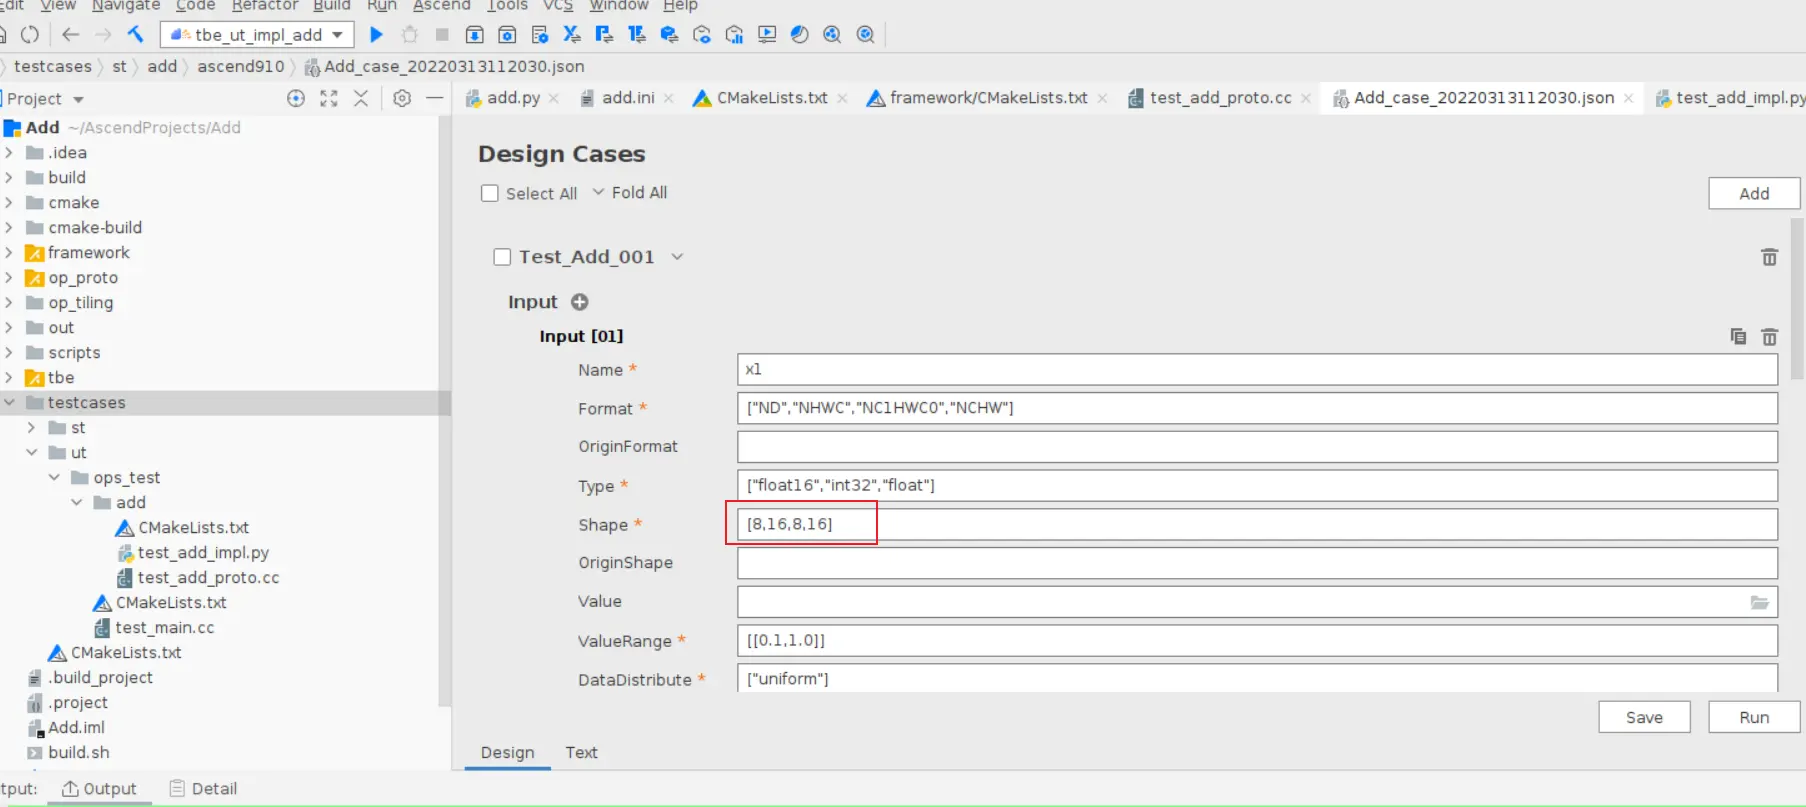 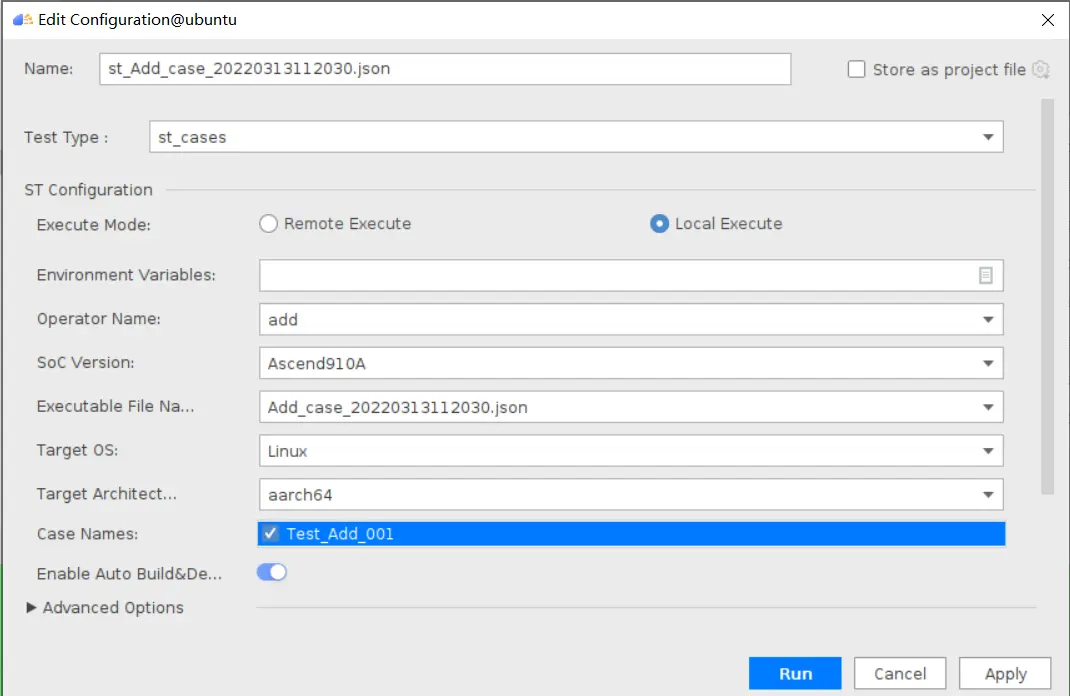 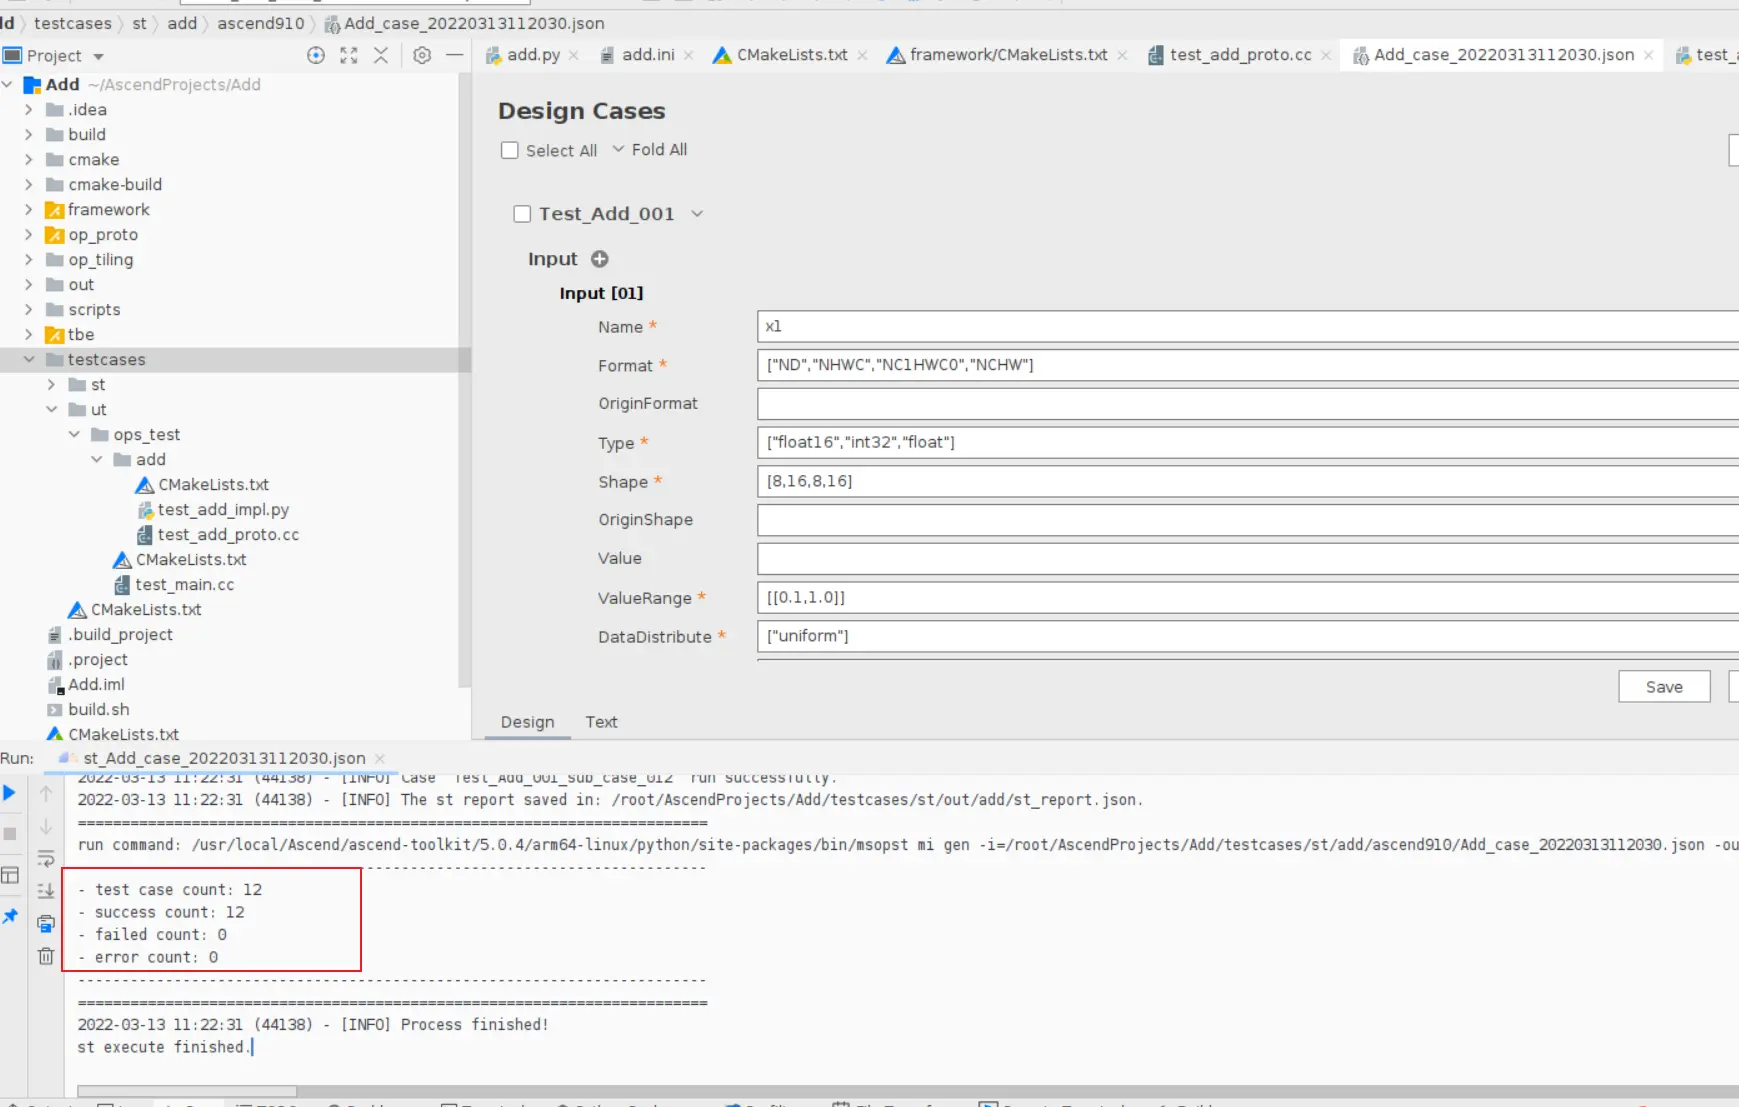 ### 八、部署 点击Ascend->Operator Deployment菜单,弹出的窗口中选择Operator Deploy Locally,Operator Package默认是我们刚才编译出来的算子Run包,点击Operator deploy按钮,算子相关交付件会部署到CANN的opp的自定义算子目录下。 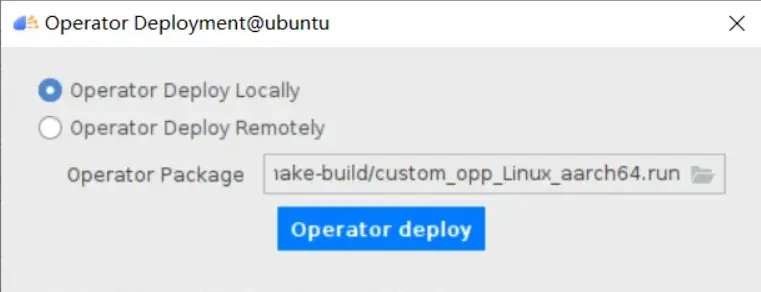
-
# MindSpore Install On GPU Server > 基于GPU服务器安装MindSpore 1.5.0 本文开发环境如下: > - Ubuntu Server 20.04 x86_64 > - Python 3.8.10 > - Cuda 11.1.0 > - RTX 3090 * 4 > - MindSpore 1.5.0 本文主要内容如下: >- 系统安装(略过) >- GPU环境配置 >- Mindspore安装及测试 >- Mindspore Serving安装及测试 >- 问题 >- 参考 ## 0. 系统安装 > `Ubuntu Server 20.04`安装过程略 ## 1. GPU环境配置 ### 1.1 NVIDIA驱动配置 > 注意事项: > > - NVIDIA驱动版本:NVIDIA-Linux-x86_64-470.86.run > - 关于dkms:由于采用run格式文件安装,未避免系统内核升级重启后,需要重新安装驱动,这里引入dkms模块。 ```shell sudo apt install dkms wget -c https://cn.download.nvidia.com/XFree86/Linux-x86_64/470.86/NVIDIA-Linux-x86_64-470.86.run chmod a+x NVIDIA-Linux-x86_64-470.86.run sudo ./NVIDIA-Linux-x86_64-470.86.run ``` 具体安装过程如下图1.1所示。 图1.1 NVIDIA驱动安装过程安装完成后,使用命令`nvidia-smi`查看是否安装成功。如果安装成功,会输入类似如下内容。 ```shell +-----------------------------------------------------------------------------+ | NVIDIA-SMI 470.86 Driver Version: 470.86 CUDA Version: 11.4 | |-------------------------------+----------------------+----------------------+ | GPU Name Persistence-M| Bus-Id Disp.A | Volatile Uncorr. ECC | | Fan Temp Perf Pwr:Usage/Cap| Memory-Usage | GPU-Util Compute M. | | | | MIG M. | |===============================+======================+======================| | 0 NVIDIA GeForce ... Off | 00000000:24:00.0 Off | N/A | | 30% 34C P0 103W / 350W | 0MiB / 24268MiB | 0% Default | | | | N/A | +-------------------------------+----------------------+----------------------+ | 1 NVIDIA GeForce ... Off | 00000000:41:00.0 Off | N/A | | 30% 35C P0 107W / 350W | 0MiB / 24268MiB | 0% Default | | | | N/A | +-------------------------------+----------------------+----------------------+ | 2 NVIDIA GeForce ... Off | 00000000:81:00.0 Off | N/A | | 30% 34C P0 103W / 350W | 0MiB / 24268MiB | 0% Default | | | | N/A | +-------------------------------+----------------------+----------------------+ | 3 NVIDIA GeForce ... Off | 00000000:E1:00.0 Off | N/A | | 30% 34C P0 103W / 350W | 0MiB / 24268MiB | 0% Default | | | | N/A | +-------------------------------+----------------------+----------------------+ +-----------------------------------------------------------------------------+ | Processes: | | GPU GI CI PID Type Process name GPU Memory | | ID ID Usage | |=============================================================================| | No running processes found | +-----------------------------------------------------------------------------+ ``` ### 1.2 CUDA环境配置 #### 1.2.1 安装CUDA ```shell wget https://developer.download.nvidia.com/compute/cuda/11.1.0/local_installers/cuda_11.1.0_455.23.05_linux.run chmod a+x cuda_11.1.0_455.23.05_linux.run sudo ./cuda_11.1.0_455.23.05_linux.run ``` 具体安装过程如下图1.2所示。 图1.2 CUDA 11.1.0 安装过程安装成功后输出如下内容: ```shell =========== = Summary = =========== Driver: Not Selected Toolkit: Installed in /usr/local/cuda-11.1/ Samples: Not Selected Please make sure that - PATH includes /usr/local/cuda-11.1/bin - LD_LIBRARY_PATH includes /usr/local/cuda-11.1/lib64, or, add /usr/local/cuda-11.1/lib64 to /etc/ld.so.conf and run ldconfig as root To uninstall the CUDA Toolkit, run cuda-uninstaller in /usr/local/cuda-11.1/bin ***WARNING: Incomplete installation! This installation did not install the CUDA Driver. A driver of version at least .00 is required for CUDA 11.1 functionality to work. To install the driver using this installer, run the following command, replacing with the name of this run file: sudo .run --silent --driver Logfile is /var/log/cuda-installer.log ``` #### 1.2.2 配置环境变量 > 添加`CUDA`环境变量的常规方法添加在`/etc/profile`或用户目录下的`.bashrc`文件中,这样每次登陆终端便会自动生效。 > > 如果需要在多个深度学习框架之间切换,且各个框架需要的`CUDA`环境不同时,上述方面即为不方便。 > > 因此,本文将`CUDA`添加到特定的bash文件中,需要使用某个`CUDA`环境时,直接`source`即可。 ```shell vim ~/env_cuda_11.1.0.sh ``` 使用上述命令在用户目录下创建`bash`文件,写入如下内容。 > 注意:`bash`文件名可以自定义。 ```shell #!/bin/bash # cuda 11.1.0 ########################### ## cuda 11.1.0 ## ########################### export PATH="/usr/local/cuda-11.1/bin:$PATH" export LD_LIBRARY_PATH="/usr/local/cuda-11.1/lib64:$LD_LIBRARY_PATH" ``` 如果要使用本文`CUDA`环境,只需要执行以下命令即可。 ```shell source ~/env_cuda_11.1.0.sh ``` 使用`nvcc -V`命令检测`CUDA`环境是否生效。生效后输出如下内容。 ```shell nvcc: NVIDIA (R) Cuda compiler driver Copyright (c) 2005-2020 NVIDIA Corporation Built on Tue_Sep_15_19:10:02_PDT_2020 Cuda compilation tools, release 11.1, V11.1.74 Build cuda_11.1.TC455_06.29069683_0 ``` ### 1.3 cuDNN环境配置 > 注意事项:`cuDNN`文件下载需要注册NVIDIA账号。 从`cuDNN`官网下载相应包,并上传到服务器。需要下载的文件如下图所示。  然后使用如下命令进行安装。 ```shell tar -zxvf cudnn-11.1-linux-x64-v8.0.5.39.tgz cd cuda sudo cp include/*.h /usr/local/cuda-11.1/include/ sudo cp -d lib64/libcudnn* /usr/local/cuda-11.1/lib64/ ``` 如果需要查看解压内容,可在解压后`cuda`目录下使用命令`tree`。 ```shell . ├── include │ ├── cudnn_adv_infer.h │ ├── cudnn_adv_train.h │ ├── cudnn_backend.h │ ├── cudnn_cnn_infer.h │ ├── cudnn_cnn_train.h │ ├── cudnn.h │ ├── cudnn_ops_infer.h │ ├── cudnn_ops_train.h │ └── cudnn_version.h ├── lib64 │ ├── libcudnn_adv_infer.so -> libcudnn_adv_infer.so.8 │ ├── libcudnn_adv_infer.so.8 -> libcudnn_adv_infer.so.8.0.5 │ ├── libcudnn_adv_infer.so.8.0.5 │ ├── libcudnn_adv_train.so -> libcudnn_adv_train.so.8 │ ├── libcudnn_adv_train.so.8 -> libcudnn_adv_train.so.8.0.5 │ ├── libcudnn_adv_train.so.8.0.5 │ ├── libcudnn_cnn_infer.so -> libcudnn_cnn_infer.so.8 │ ├── libcudnn_cnn_infer.so.8 -> libcudnn_cnn_infer.so.8.0.5 │ ├── libcudnn_cnn_infer.so.8.0.5 │ ├── libcudnn_cnn_train.so -> libcudnn_cnn_train.so.8 │ ├── libcudnn_cnn_train.so.8 -> libcudnn_cnn_train.so.8.0.5 │ ├── libcudnn_cnn_train.so.8.0.5 │ ├── libcudnn_ops_infer.so -> libcudnn_ops_infer.so.8 │ ├── libcudnn_ops_infer.so.8 -> libcudnn_ops_infer.so.8.0.5 │ ├── libcudnn_ops_infer.so.8.0.5 │ ├── libcudnn_ops_train.so -> libcudnn_ops_train.so.8 │ ├── libcudnn_ops_train.so.8 -> libcudnn_ops_train.so.8.0.5 │ ├── libcudnn_ops_train.so.8.0.5 │ ├── libcudnn.so -> libcudnn.so.8 │ ├── libcudnn.so.8 -> libcudnn.so.8.0.5 │ ├── libcudnn.so.8.0.5 │ └── libcudnn_static.a └── NVIDIA_SLA_cuDNN_Support.txt ``` ### 1.4 NCCL环境配置 > 注意事项: > > - 如果非多GPU环境,可跳过本步骤。 > > - `NCCL`文件下载需要注册NVIDIA账号。 从`NCCL`官网下载相应包,并上传到服务器。需要下载的文件如下图所示。  然后使用如下命令进行安装。 ```shell tar -xvf nccl_2.8.4-1+cuda11.1_x86_64.txz cd nccl_2.8.4-1+cuda11.1_x86_64 sudo cp include/*.h /usr/local/cuda-11.1/include/ sudo cp -d -r lib/* /usr/local/cuda-11.1/lib64/ ``` 如果需要查看解压内容,可在解压后`nccl_2.8.4-1+cuda11.1_x86_64`目录下使用命令`tree`。 ```shell . ├── include │ ├── nccl.h │ └── nccl_net.h ├── lib │ ├── libnccl.so -> libnccl.so.2 │ ├── libnccl.so.2 -> libnccl.so.2.8.4 │ ├── libnccl.so.2.8.4 │ ├── libnccl_static.a │ └── pkgconfig │ └── nccl.pc └── LICENSE.txt ``` ### 1.5 TensorRT环境配置 > 注意事项: > > - 如果不使用`MindSpore Serving`推理服务,可跳过本步骤。 > > - 本文采用tar文件安装方式,需要先注册NVIDIA账号下载相应文件。 从`TensorRT`官网下载相应包,并上传到服务器。需要下载的文件如下图所示。  然后使用如下命令进行安装。 - 基础依赖库安装。 ```shell tar zxvf TensorRT-7.2.2.3.Ubuntu-18.04.x86_64-gnu.cuda-11.1.cudnn8.0.tar.gz mkdir ~/tensorrt mv TensorRT-7.2.2.3 ~/tensorrt/ ``` 在1.2.2中的`env_cuda_11.1.0.sh`文件中增加`tensorrt`环境。内容如下。 ```shell # ${TensorRT-path}为变量,需要替换为你的真实目录。 # 例如:LD_LIBRARY_PATH=/home/ubuntu/tensorrt/TensorRT-7.2.2.3/lib:$LD_LIBRARY_PATH export LD_LIBRARY_PATH=${TensorRT-path}/lib>:$LD_LIBRARY_PATH ``` - python包安装 > 建议:在完成Mindspore虚拟环境创建并激活后安装 ```shell cd ~/tensorrt/TensorRT-7.2.2.3/ pip3 install python/tensorrt-7.2.2.3-cp38-none-linux_x86_64.whl pip3 install uff/uff-0.6.9-py2.py3-none-any.whl pip3 install graphsurgeon/graphsurgeon-0.4.5-py2.py3-none-any.whl pip3 install onnx_graphsurgeon/onnx_graphsurgeon-0.2.6-py2.py3-none-any.whl ``` ## 2. MindSpore安装及测试 #### 2.1 安装`Python`基础环境 > 如果已经安装,可跳过本步骤。 ```shell sudo apt update sudo apt install python3 python3-dev python3-pip sudo pip3 install virtualenv ``` 可以使用`python3 -V`命令检查安装的`python`版本。本文版本信息如下。 ```shell Python 3.8.10 ``` #### 2.2. 安装`MindSpore` - 创建虚拟环境 ```shell virtualenv -p python3 env_mindspore_1.5.0 ``` 输出内容如下 ```shell created virtual environment CPython3.8.10.final.0-64 in 292ms creator CPython3Posix(dest=/mnt/data_0301_12t/xingchaolong/home/pyenvs/env_mindspore_1.5.0, clear=False, no_vcs_ignore=False, global=False) seeder FromAppData(download=False, pip=bundle, setuptools=bundle, wheel=bundle, via=copy, app_data_dir=/home/xingchaolong/.local/share/virtualenv) added seed packages: pip==21.3.1, setuptools==58.3.0, wheel==0.37.0 activators BashActivator,CShellActivator,FishActivator,NushellActivator,PowerShellActivator,PythonActivator ``` - 激活虚拟环境 ```shell source env_mindspore_1.5.0/bin/activate ``` - 激活`CUDA`环境 ```shell source ~/env_cuda_11.1.0.sh ``` - 安装`mindspore` ```shell pip3 install https://ms-release.obs.cn-north-4.myhuaweicloud.com/1.5.0/MindSpore/gpu/x86_64/cuda-11.1/mindspore_gpu-1.5.0-cp38-cp38-linux_x86_64.whl --trusted-host ms-release.obs.cn-north-4.myhuaweicloud.com -i https://pypi.tuna.tsinghua.edu.cn/simple ``` #### 2.3 测试`Mindspore` 使用如下命令测试是否安装成功。 ```shell python3 -c "import mindspore;mindspore.run_check()" ``` 如果安装成功,输出如下内容。 ```shell MindSpore version: 1.5.0 The result of multiplication calculation is correct, MindSpore has been installed successfully! ``` ## 3. MindSpore Serving安装及测试 > 注意事项: > > - MindSpore Serving目前并未安装成功,以下步骤仅供参考。 #### 3.1 安装`MindSpore Serving` ```shell pip3 install https://ms-release.obs.cn-north-4.myhuaweicloud.com/1.5.0/Serving/x86_64/mindspore_serving-1.5.0-cp38-cp38-linux_x86_64.whl --trusted-host ms-release.obs.cn-north-4.myhuaweicloud.com -i https://pypi.tuna.tsinghua.edu.cn/simple ``` #### 3.2 测试`MindSpore Serving` ```shell python3 -c "from mindspore_serving import server" ``` 如果没有报错,则表示安装成功。 ## 4. 总结 本文介绍了Ubuntu Server 20.04环境下,基于英伟达GPU硬件配置相关环境,安装MindSpore及对其测试。 ## 问题 - MindSpore Serving测试时出现以下问题 ```shell free(): invalid pointer Aborted (core dumped) ``` 目前官方已修复该问题。 ## 参考 - [DKMS简介](http://abcdxyzk.github.io/blog/2020/09/21/kernel-dkms/) - [TensorRT安装](https://docs.nvidia.com/deeplearning/tensorrt/install-guide/index.html#installing-tar) - [安装MindSpore](https://www.mindspore.cn/install) - [安装MindSpore Serving](https://www.mindspore.cn/serving/docs/zh-CN/r1.5/serving_install.html)
-
 Micro,Tiny,Mini,Lite是一群好搭档(傻傻分不清楚)。如果没有特别跟你说,一般情况下你都不知道带这些单词的词组到底是什么意思。比如MindSpore Lite是MindSpore的端边AI引擎,TensorFlow Lite却是TF在移动设备和嵌入式设备的轻量级解决方案。这两个反倒是要对标的。那么TinyMS,作为Tiny、Modular、Simple的缩写,对标的却是Keras——Tensorfow的高阶API。当然,同时被华为TinyMS对标的是Fastai——PyTorch的高阶API。我们一直知道的是,MindSpore的移植最常见的就是从TF和PyTorch迁移,那么Keras和Fastai这对胖哥俩,自然一个都少不了。搞清楚TinyMS的定位了,就不得不提到几个著名的MindSpore女神,一个是来自数学系的夏洛特77(曼sir跑)小姐姐,一个是来自梯度森林会剧场的喂~你好(HelloWay)小姐姐。近期两人都很少在公共培训场合露面,特别是作为运营大神的胡大大,居然专心去做TinyMS去了。而在21天MindSpore实战营疯狂输出课程的何芦微老师,明明可以靠颜值斩获最佳短剧女一号,非要靠技术。在两人(以及一群人)的刻苦钻研下,TinyMS才横空出世。闲话少说,我们就看看TinyMS该怎么玩吧。在玩转TinyMS之前,得先去B站看下曼sir的保姆级教程(一共10集,目前已推出了5集):【保姆级教程】EP01-最适合小白的深度学习入门课程来了!https://www.bilibili.com/video/BV1MB4y1P79S【保姆级教程】EP02-计算机是如何识别图像的?+TinyMS三种安装方式详解https://www.bilibili.com/video/BV18v41187fX【保姆级教程】EP03-30min速成Shell脚本命令https://www.bilibili.com/video/BV1vy4y1b7jh【保姆级教程】EP04-30min速成Python指南(上)| MindSpore高阶API工具TinyMS系列教程https://www.bilibili.com/video/BV1Tp4y1b7UG【保姆级教程】EP05-30min速成Python指南(下)| MindSpore高阶API工具TinyMS系列教程https://www.bilibili.com/video/BV1XS4y1Z7yp其实看了第二段,就可以安装TinyMS了。当然,我们还是要结合官网:https://tinyms.readthedocs.io/zh_CN/v0.3.1/quickstart/install.html张小白还是用WSL2(Ubuntu 18.04)来安装吧。这上面已经安装好了Anaconda,但是Python是3.8版本所以用conda建一个python 3.7.5的环境:按Y继续:确认了3.7.5的大蟒蛇眼神之后,开始安装:pip install tinyms==0.3.1 -i http://mirrors.aliyun.com/pypi/simple/ --trusted-host mirrors.aliyun.com看来还得降级装一下0.3.0的版本:pip install tinyms==0.3.0 -i http://mirrors.aliyun.com/pypi/simple/ --trusted-host mirrors.aliyun.com。。。验证安装是否成功:查看tinyms的版本:pip show tinyms查看下wsl2的IP地址:(好像看了也没啥用)启动jupyter lab:我们到JupyterLab页面去看看怎么玩转TinyMS。浏览器打开以下地址: http://127.0.0.1:8888/lab?token=ce99234cec88f7be435dbb47d16cfe5d5de656d1d5369692选择Python后打开:奇怪,怎么没有tinyms包呢?经过度娘得知,原来还需要安装下nb_conda:安装之后,好像还是不行。再二次度娘“jupyter notebook 设定指定conda环境”得知:https://blog.csdn.net/gs344937933/article/details/121883105需要做个设置:python -m ipykernel install --user --name tinyms --display-name "Python (tinyms)"然后再到Notebook中,切换下内核:再重试下:好了,那我们来试下样例的TinyMS吧( https://tinyms.readthedocs.io/zh_CN/v0.3.1/quickstart/quickstart_in_one_minute.html )感觉好像还是版本不匹配引起的,试着安装下tinyms的0.3.1版本吧:pip install tinyms==0.3.1 不使用国内pip源速度慢一点,但是却可以装。那就耐心等待安装结束吧。再来重启jupyter lab和重新执行Notebook终于可以了。(牛年不容易,期望虎年容易些。。)创建LeNet网络:下载数据集:耐心等待下载完毕:下面开始训练模型:。。。耐心等待第一个epoch 1875个step结束:可见左边的ckpt模型文件已经生成。然后开始评估:定义servable json启动服务器:此时,因为这个命令没有执行完毕,所以出现不了数字。再打开一个新的Notebook(选择TinyMS内核)准备图片:查看后台模型:进行推理(通过serving发送请求)可以看到推理的结果是7。再切换到原来的服务端,关闭服务:这就完成了手写数字LeNet网络的训练和推理过程。从上面的体验可以看出:(1)从主体代码来看,TinyMS像是将基本代码和MindSpore Serving做了个结合。(2)训练代码在建立网络上略显得简洁,训练参数也略有减少,但是所有的步骤貌似都没减少。如果让用户看到更少的参数设置或许会更好一点。(3)推理代码一行话完成,确实也简洁了很多。说明TinyMS团队的目标就是让开发者使用起来更简单一些。这就是MindSpore跟TinyMS开发的对比。至于TinyMS跟Keras开发的对比,我们下次再看一下吧。先祝大家虎年吉祥。(全文完,谢谢阅读)
 -
 问题现象创建训练作业,Tensorflow多节点作业下载数据到/cache显示:“No space left”。原因分析TensorFlow多节点任务会启动parameter server(简称ps)和worker两种角色,ps和worker会被调度到相同的机器上。由于训练数据对于ps没有用,因此在代码中ps相关的逻辑不需要下载训练数据。如果ps也下载数据到“/cache”实际下载的数据会翻倍。例如只下载了2.5TB的数据,程序就显示空间不够而失败,因为/cache只有4TB的可用空间。处理方法在使用Tensorflow多节点作业下载数据时,正确的下载逻辑如下:import argparse parser = argparse.ArgumentParser() parser.add_argument("--job_name", type=str, default="") args = parser.parse_known_args() if args[0].job_name != "ps": copy..............................
 -
 MindSpore可以做模型的自动切分这一点让人印象深刻。当然,还有很多特点,比如自动微分、支持动态图+静态图,等等。如果希望了解更多,请看MindSpore官网:MindSporewww.mindspore.cn/对于个人来讲,去年便对MindSpore有简单了解,做过一些其与TensorFlow、PyTorch的对比分析。因为此前尚未开源,只能基于公开的文档做调研而已。而三月底,在HDC大会时,华为正式开源了MindSpore的源码和相应的文档。因而有机会实际拿来运行看看,本文将介绍如何在Windows平台安装和搭建MindSpore,同时训练一个小的网络(LeNet)。安装MindSpore截至今天,MindSpore官网建议的安装操作系统为EulerOS和Ubuntu,并不包括Windows。而不幸的是我的这台Lenovo游戏主机是Windows 10的系统。仔细了下文档,发现实际上MindSpore是支持Windows平台的[1],只不过只能以CPU的模式运行(暂时不支持Windows平台的GPU)。如果希望尝试MindSpore对GPU的支持,需要使用Ubuntu系列或者华为的EulerOS(这也不是本文的重点)。下面进入安装的正题。安装Anaconda非常推荐使用Anaconda作为Python虚拟环境的管理。你可以去Anaconda官网下载,一路Next即可。如果遇到问题,可适当参考这里。由于Anaconda的安装过程简单直观,这里不详述了。创建MindSpore的Python Env目前MindSpore仅仅支持Python 3.7.5,下面创建的pyhton env就叫做mindspore:conda create -n mindspore python=3.7.5安装MindSpore下载MindSpore的whl文件,下载地址见这里,目前只有一个0.1.0的版本mindspore-0.1.0-cp37-cp37m-win_amd64.whl在mindspore这个python env里执行:conda activate mindspore # 此时你应该在mindspore-0.1.0-cp37-cp37m-win_amd64.whl这个文件的目录里pip install mindspore-0.1.0-cp37-cp37m-win_amd64.whl注意,这里很多同学反应安装过程很慢,甚至有失败的情况,基本都是网络惹得祸。因为安装上面的whl文件时会按照一些依赖的libraries,如果你的pip是默认源的话,在国内的网络下载时可能遇到问题的。一个解决办法是重试(yes, just retry),另一个办法是把pip源切换为国内的源,比如清华源。具体方法见这里:Tsinghua Open Source Mirrormirror.tuna.tsinghua.edu.cn/help/pypi/正在上传…重新上传取消一个临时的办法可以是:pip install -i https://pypi.tuna.tsinghua.edu.cn/simple mindspore-0.1.0-cp37-cp37m-win_amd64.whl验证Spore安装是否成功python>>> import mindspore as ms>>> print(ms.__version__)# 如果成功,上面应该打印 0.1.0训练一个LeNet华为官方已经在其MindSpore Doc这个Repo里内置了一些examples,比如LeNet。直接Fork吧:git clone https://github.com/mindspore-ai/docs.git如果你和我一样懒,仅仅下载lenet.py也可以,路径如下:https://github.com/mindspore-ai/docs/blob/master/tutorials/tutorial_code/lenet.py训练LeNet因为这个代码里默认使用的训练设备为Ascend,所以需要手动设置一下--device_target为CPU:python lenet.py --device_target CPUMindSpore用LeNet训练MNIST大约十几秒就可以跑完一个Epoch了:******Downloading the MNIST dataset******============== Starting Training ==============epoch: 1 step: 1, loss is 2.3008137epoch: 1 step: 2, loss is 2.299688epoch: 1 step: 3, loss is 2.309444epoch: 1 step: 4, loss is 2.3006275epoch: 1 step: 5, loss is 2.3028035epoch: 1 step: 6, loss is 2.302422epoch: 1 step: 7, loss is 2.3067183epoch: 1 step: 8, loss is 2.3057096epoch: 1 step: 9, loss is 2.3042586epoch: 1 step: 10, loss is 2.303799.........epoch: 1 step: 1870, loss is 0.15847126epoch: 1 step: 1871, loss is 0.12955114epoch: 1 step: 1872, loss is 0.15605931epoch: 1 step: 1873, loss is 0.28985676epoch: 1 step: 1874, loss is 0.14183074epoch: 1 step: 1875, loss is 0.05726877============== Starting Testing ============================ Accuracy:{'Accuracy': 0.9625400641025641} ==============看看Accuracy,已经到96.25%,还可以~我们观察一下这个目录,会看到同时还保存了模型文件(.ckpt和.meta)还有train、val时的pb文件,具体待后面再讲。04/25/2020 12:21 PM 494,155 checkpoint_lenet-1_1875.ckpt04/25/2020 12:20 PM 15,033 checkpoint_lenet-graph.meta04/25/2020 02:36 PM 4,831 ms_output_0eval.pb04/25/2020 02:36 PM 15,878 ms_output_0train.pb避坑指南也许在上面你会遇到MNIST数据集下载的问题。以我自己为例,在电信的宽带下载MNIST几乎是龟速,实在没法忍,想起此前在其他Repo下载过这个数据集的几个gz文件。于是copy进lenet.py里定义的路径:train_path = "./MNIST_Data/train/"test_path = "./MNIST_Data/test/"需要注意的是需要分别copy train-*到./MNIST_Data/train, t10k-*到./MNIST_Data/test如果你之前没下载过,你可以直接在这里下载下面这个link的MNIST_DATA的压缩包,解压到lenet.py的同级目录即可:https://gitee.com/loveunk/mindspore/blob/master/example/_lenet_demo/MNIST_Data.zip————————————————原文链接:https://blog.csdn.net/weixin_54227557/article/details/121237191
 -
参考代码链接https://gitee.com/shufanasia/examples
推荐直播
-
 华为云云原生FinOps解决方案,为您释放云原生最大价值
2024/04/24 周三 16:30-18:00
Roc 华为云云原生DTSE技术布道师
还在对CCE集群成本评估感到束手无策?还在担心不合理的K8s集群资源申请和过度浪费?华为云容器服务CCE全新上线云原生FinOps中心,为用户提供多维度集群成本可视化,结合智能规格推荐、混部、超卖等成本优化手段,助力客户降本增效,释放云原生最大价值。
回顾中 -
 鲲鹏开发者创享日·江苏站暨数字技术创新应用峰会
2024/04/25 周四 09:30-16:00
鲲鹏专家团
这是华为推出的旨在和众多技术大牛、行业大咖一同探讨最前沿的技术思考,分享最纯粹的技术经验,进行最真实的动手体验,为开发者提供一个深度探讨与交流的平台。
正在直播 -
 产教融合专家大讲堂·第①期《高校人才培养创新模式经验分享》
2024/04/25 周四 16:00-18:00
于晓东 上海杉达学院信息科学与技术学院副院长;崔宝才 天津电子信息职业技术学院电子与通信技术系主任
本期直播将与您一起探讨高校人才培养创新模式经验。
去报名
热门标签